What is Raspberry Pi?
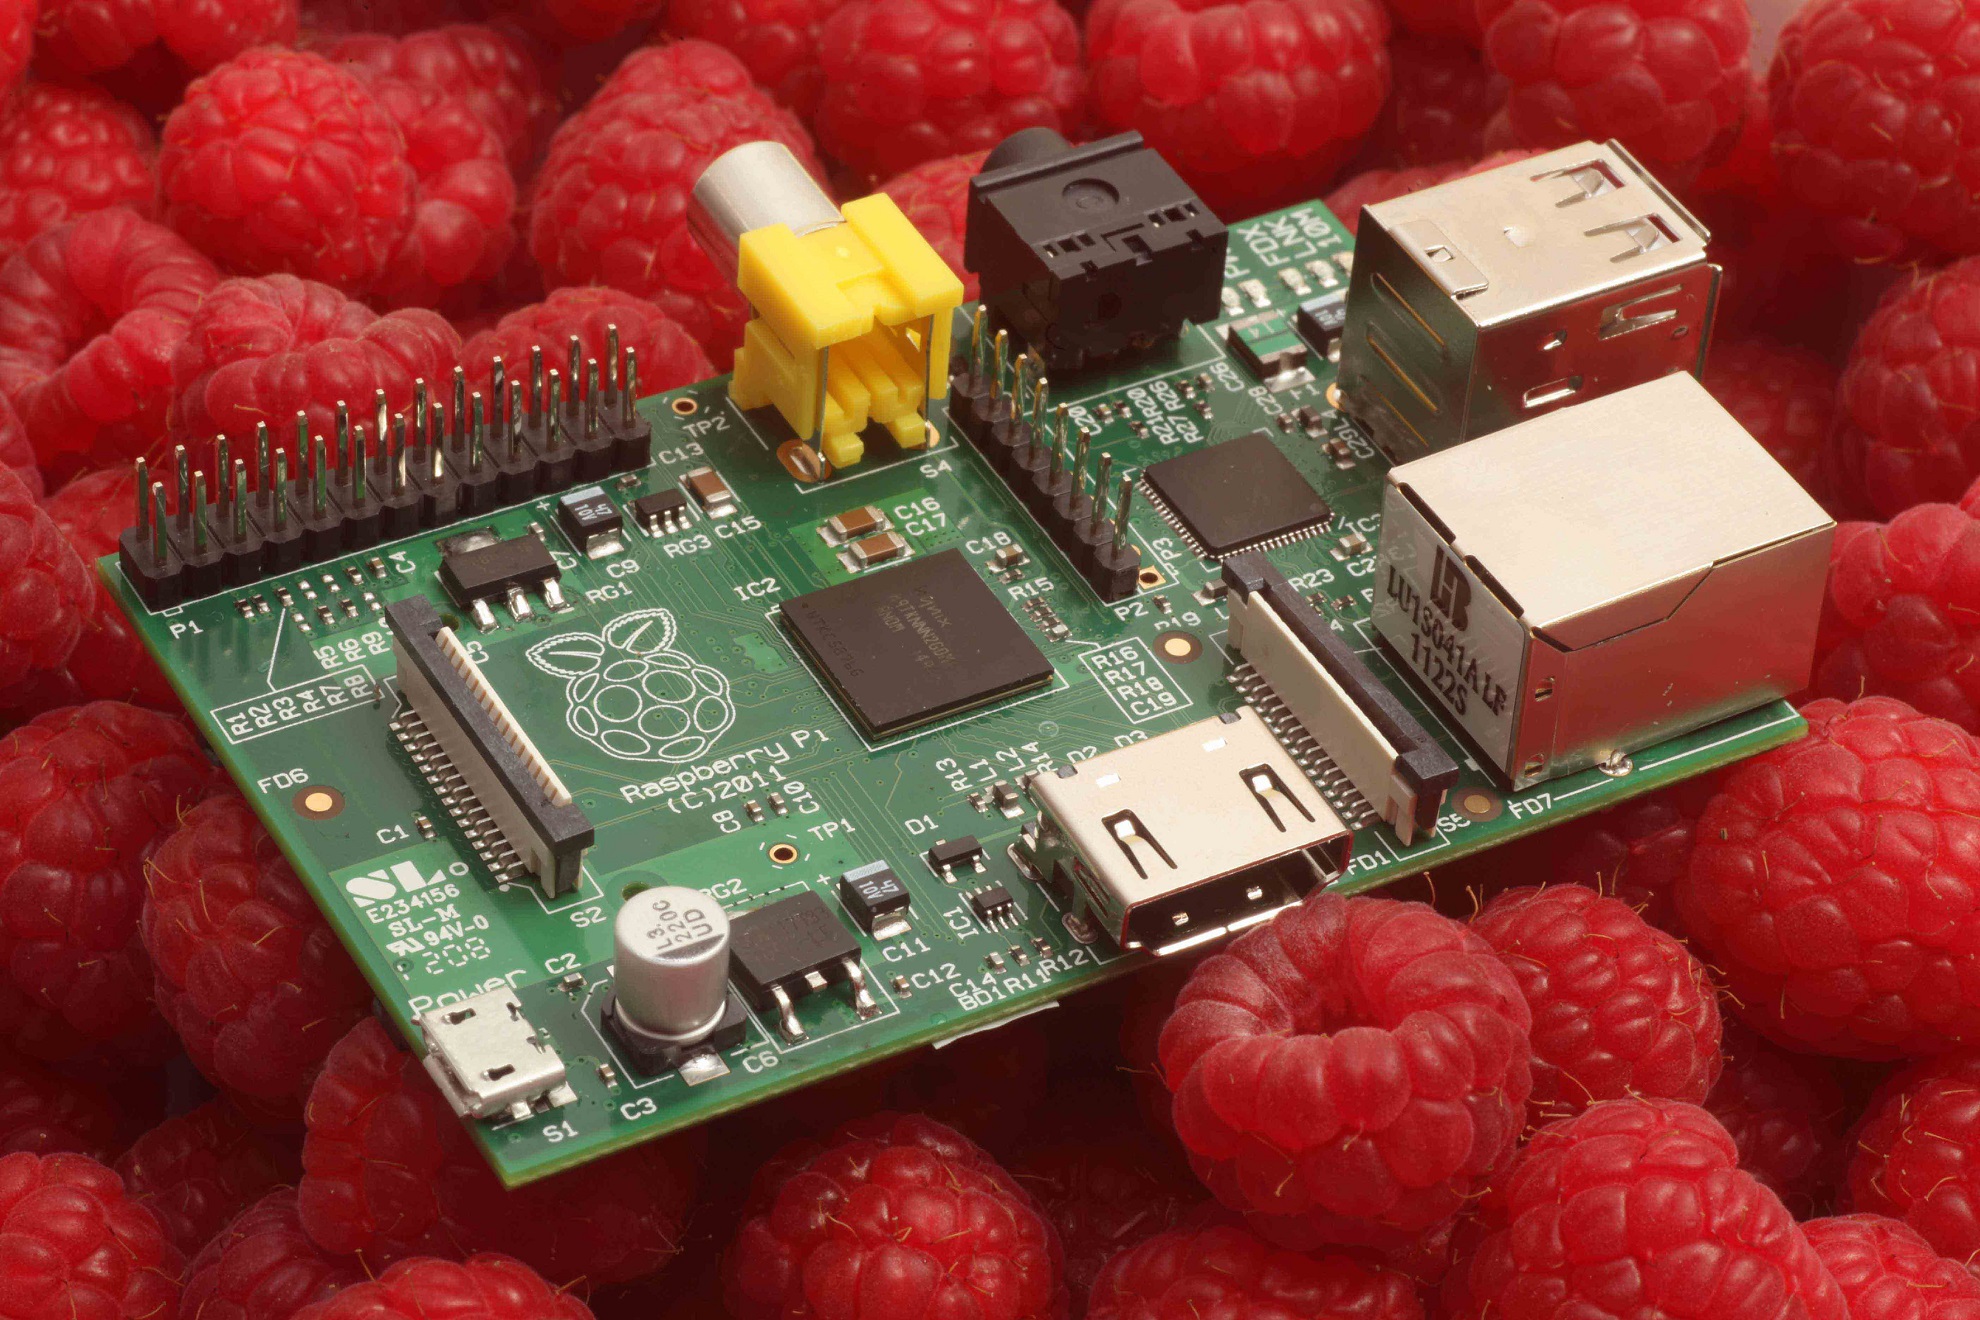
Developed with the intension of promoting computer science among students, Raspberry Pi(RPi) is a small (credit card sized) yet powerful computer and development board.
From word processing and gaming to playing High definition videos and running web servers, this handy gadget is capable doing many of the things your PC does.
Raspberry Pi is Developed by the Raspberry Pi Foundation, and is manufactured by Element 14/Premier Farnell, RS Components and Egoman. R-Pi comes in two versions . Model A has 256MB RAM, one USB port and no Ethernet. Model B has 512MB RAM, 2 USB port and an Ethernet port. Model A is priced at $25 and the Model B $35.
Here, we are working with Raspberry Pi model B revision 2.0 and it has following specifications.
- SoC: Broadcom BCM2835 (CPU, GPU and SDRAM)
- CPU: 700 MHz ARM1176JZF-S core (ARM11 family)
- GPU: Broadcom VideoCore IV, OpenGL ES 2.0, OpenVG 1080p30 H.264/MPEG-4 AVC High-Profile decoder
- Memory (SDRAM): 512 Megabytes (MiB)
- Video output: Composite RCA, HDMI
- Audio output: 3.5 mm, HDMI
- Mass storage: SD/MMC slot
- USB: two USB2.0 ports
- Network: 10/100 Ethernet RJ45
- Power supply: 5V/700 mA (3.5 W) via microUSB
- Dimensions: 85.6 mm x 53.98 mm
RPi has 26 GPIO(General Purpose Input/Output ) pins supporting 3.3 V levels for low level operations.
Setting up Raspberry Pi
Before you start working with RPi, just like your desktop PC, an operating system has to be installed. Various operating systems are available for RPi and some of them are optimized for specific tasks. Here, we are installing Raspbian which is the standard operating system for RPi. You can download the latest version of the operating system from here.
R-Pi doesn’t have a persistent internal memory. Hence the operating system have to be burnt into a memory card and insert in to the RPi. For this you will be needing a 4 GB SD card (at least class 4). To burn the operating system to the SD card Win32DiskImager tool have to be used.

Insert the SD card into your desktop or laptop and follow the steps below.
- Extract Win32DiskImager and run the .exe file. For windows 7 0r 8 users, choose Run As Administrator.
- From the drop down menu labled Device select the SD card. (if it is not already selected)
- Now from the Image file section browse to the Rasbian .img file you downloaded and click Write.
The Win32DiskImager will burn the operating system to the SD card and when it completes , safely remove the SD card and insert it into the RPi.
Now plug the RPi to a TV or a monitor with a HDMI cable or a RCA connector and plug in a USB keyboard and mouse. If you are using a RCA connector, you can plug in a set of speakers to the 3.5mm audio jack. Power up the device with a micro USB power supply capable of providing atleast 700mA at 5 V.
When your RPi boots up for the first time, you will come across the Raspi-config screen. Here, you will have to configure several things.
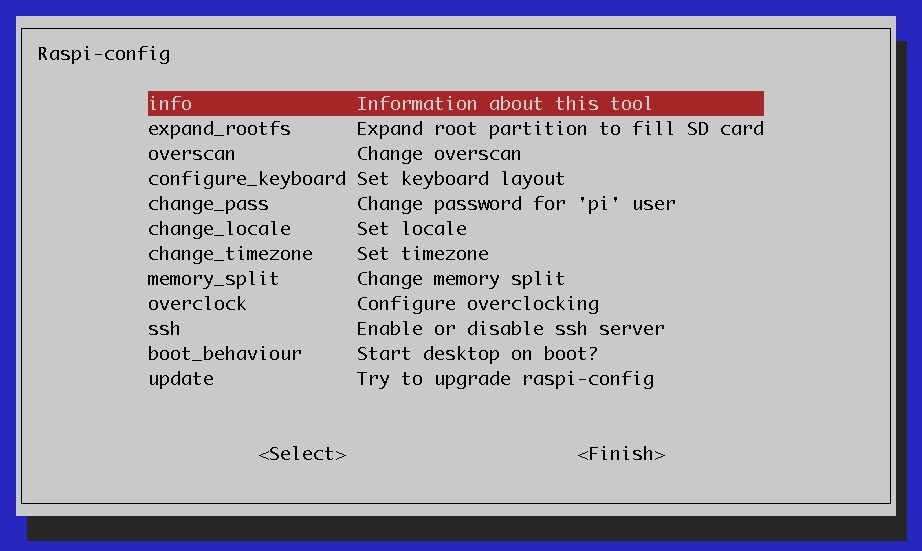
Raspi-config screen
Select expand_rootfs and press enter. Then confirm your selection.

What this does is expanding the file system so you can use the total space of your memory card. After few seconds you will be directed back to the Raspi-config screen.
From the Raspi-config screen, select change-timezone from which you can set the time zone and the respective city.

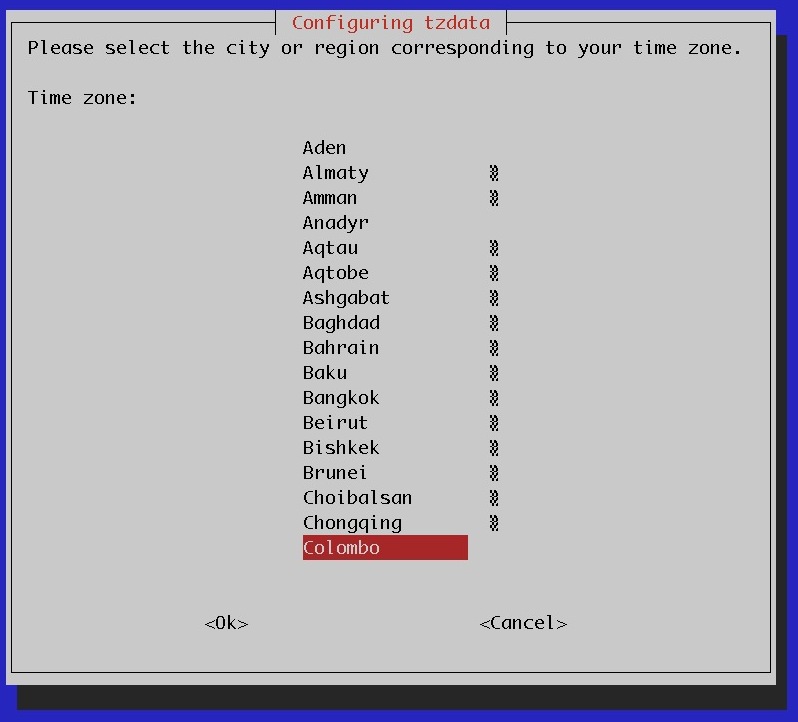
Screen for selecting the city
Confirm your selection and you will be directed back to the Raspi-config screen.
Raspberry Pi shares its memory between System memory and GPU(graphics processing unit) and we can can change the amount of memory reserved for GPU. Since we are going to use the GUI(Graphical User Interface), 64 Mb of the RAM was reserved for the GPU. Depending on the situation, you might want to allocate 128, or even 256 Mb of RAM for the GPU. And if you are not going to use the GUI, just set it up to 16 Mb.
You can change this by selecting memory-split on the Raspi-config screen.
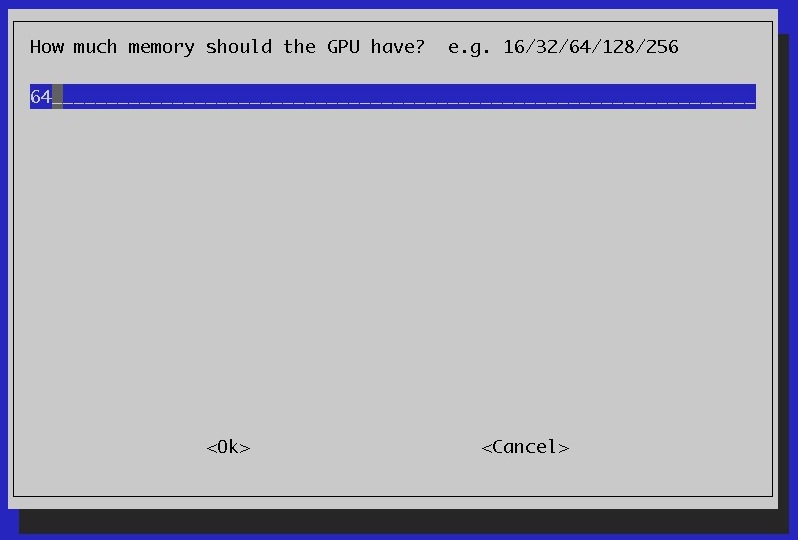
Screen for selecting the memory for GPU
If you want to want to go straight to the desktop from next time you boot your RPi, you can select that by going into the boot_behaviour option in the Raspi-config menu.

Screen for changing the boot behaviour
After changing the above settings, select the FINISH option at the bottom of the Raspi-config screen.
Now you will be asked if you want to reboot. Select YES.
Your R-Pi will now be rebooted and since the file system is being expanded, this may take about a minute. Then you will be asked to login and you will have to use the default user name and password.
Username : pi
Password : raspberry
If you changed the configuration settings earlier in boot_behaviour, you will be directed straight into to the desktop or else you can just type startx and go to the desktop.
Congratulations!! Now your RPi id up and running.
Working with the Operating System
The operating system being dealt with throughout the whole project is Debian, but a Raspberry Pi specific version which is more of a pure Linux environment. A terminal is used to work with this processor once the operating system starts running without an error. Two terminals are allowed for the guest user and the root user as LXTerminal and Root Terminal, respectively. The two user types are described in detail below.
Root User
At login, use “root” for the username and set up a password after the username is entered.
This user has permission to change or work with any corner of the system. Root Terminal is the default terminal for this user. Root Terminal permits any input operation without generating errors. You can open the Root Terminal once the desktop loads (Menu > Accessories > Root Terminal)
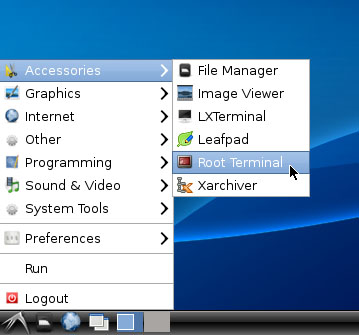
(Menu > Accessories > Root Terminal)

Root Terminal
Once the Root Terminal loads, observe the line displayed.
root@raspberrypi ~ $
“root” is the username of the root user and after the @ sign, “raspberrypi” is the default hostname, which is the name used for identifying this machine in a network. Therefore, it is better to change the hostname before starting work.
Non-root User
At login, use “pi” as the username and the password is “raspberrypi” by default. (You can change the password any time.)
Privileges for this user are completely different than for the root user. This user is considered a guest to the computer and is not allowed to make any changes to any system files without an authorization. As stated above, LXTerminal is the default for guest use.

LXTerminal
On the LXTerminal (Menu > Accessories > LXTerminal), once loaded, the line displayed at the beginning is similar to that of the Root Terminal but the username “root” is replaced by “pi” which is the username for the guest user.
pi@raspberrypi ~ $
It is possible to switch to Root Terminal using the command,
# sudo su
It is also possible to carry on in LXTerminal and execute commands in root privileges using the word “sudo” at the beginning of every command. For example,
# sudo nano /etc/network/interfaces
This opens the file interfaces at the location /etc/network/interfaces, using nano editor which is one of many editors in this operating system, with root privileges over the file. Files such as this that have control over operations of the system are not allowed to be edited unless you are the root user.
Note: Use of “sudo” can be applied on Root Terminal as well. Therefore, the following commands can be executed on either terminal.
Setting up a new password
# sudo passwd root

Enter above line and terminal asks for the new password and a confirmation.

Once the password is confirmed and entered, a success message is displayed.

Setting up a hostname
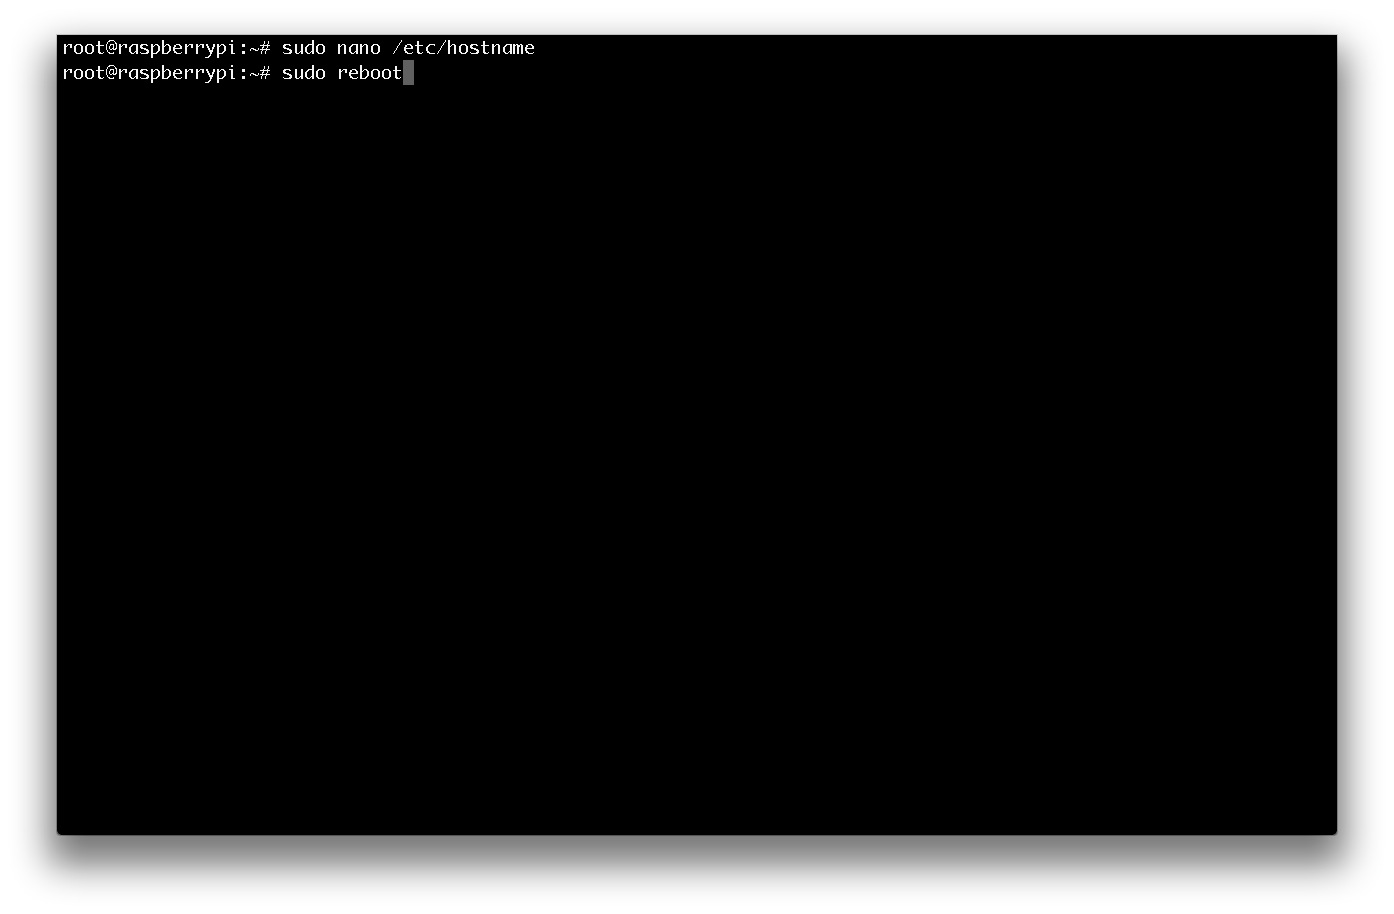
# sudo nano /etc/hostname
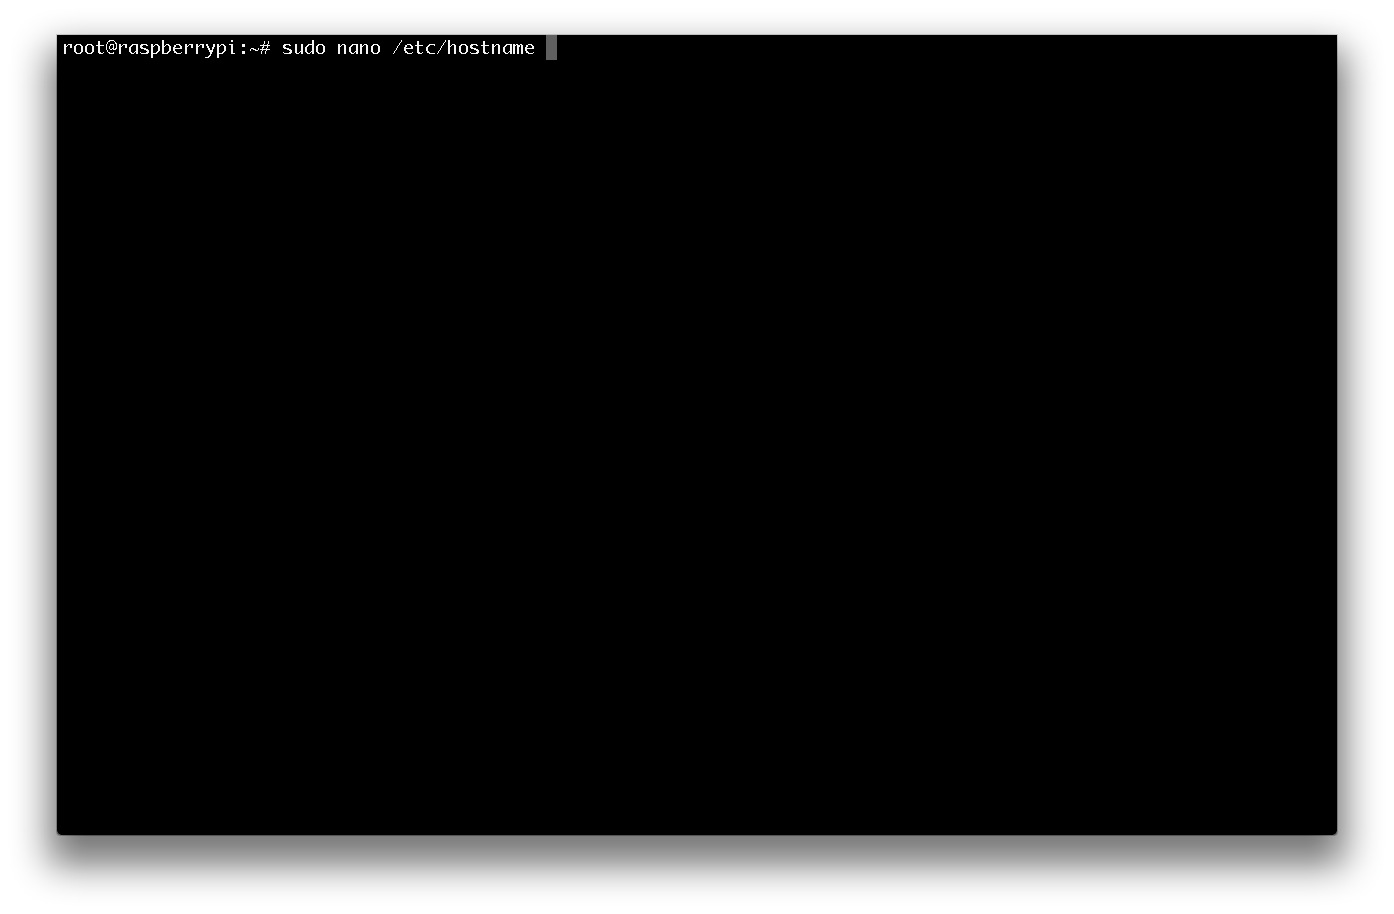
Enter the above line and it opens a file that displays “raspberrypi”, which is the default hostname.
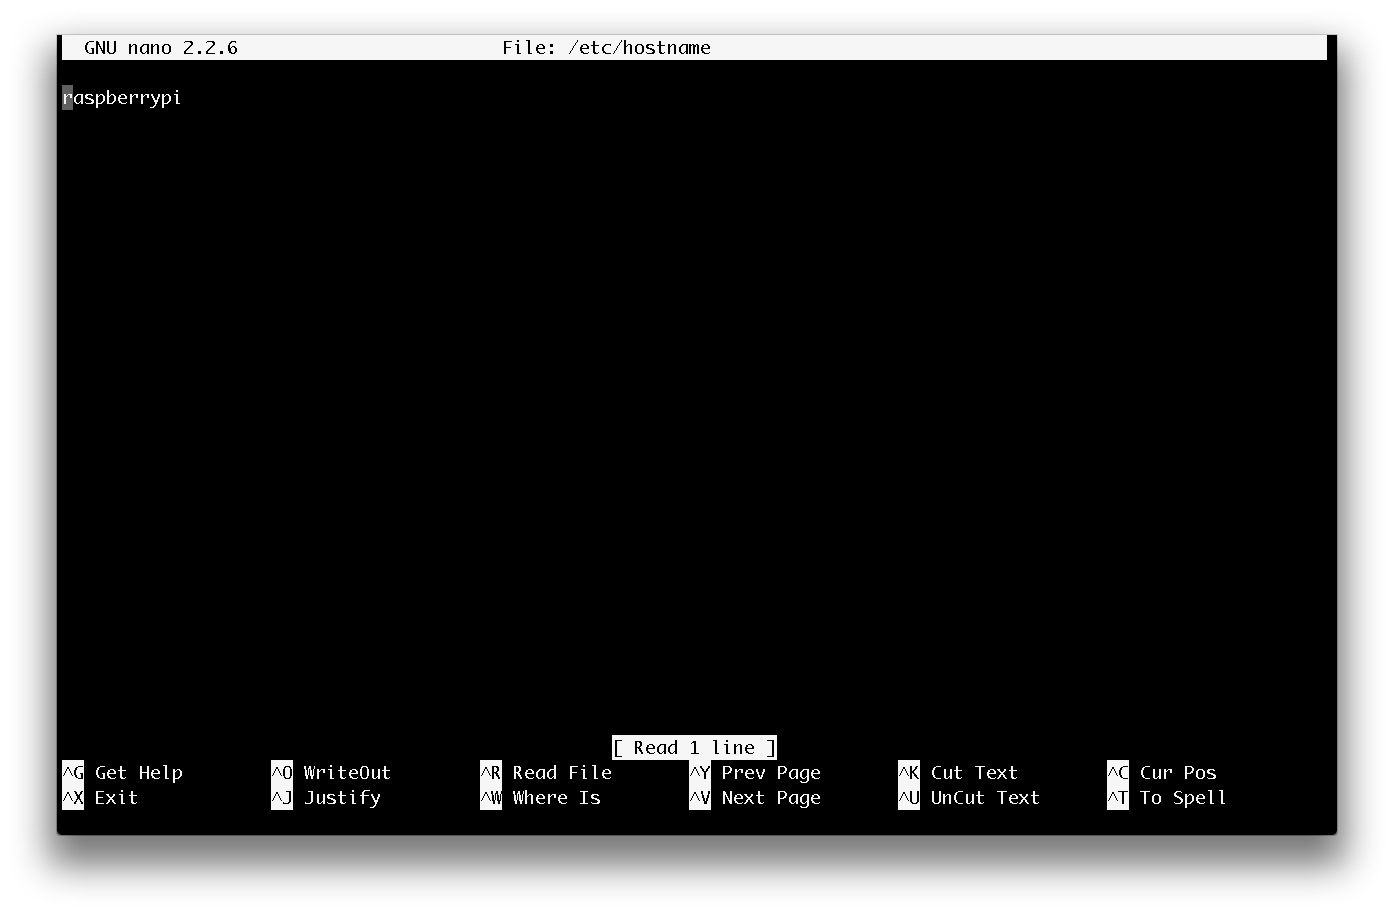
Replace it by whatever the name you prefer as the hostname, which is set to “LSU”, here.
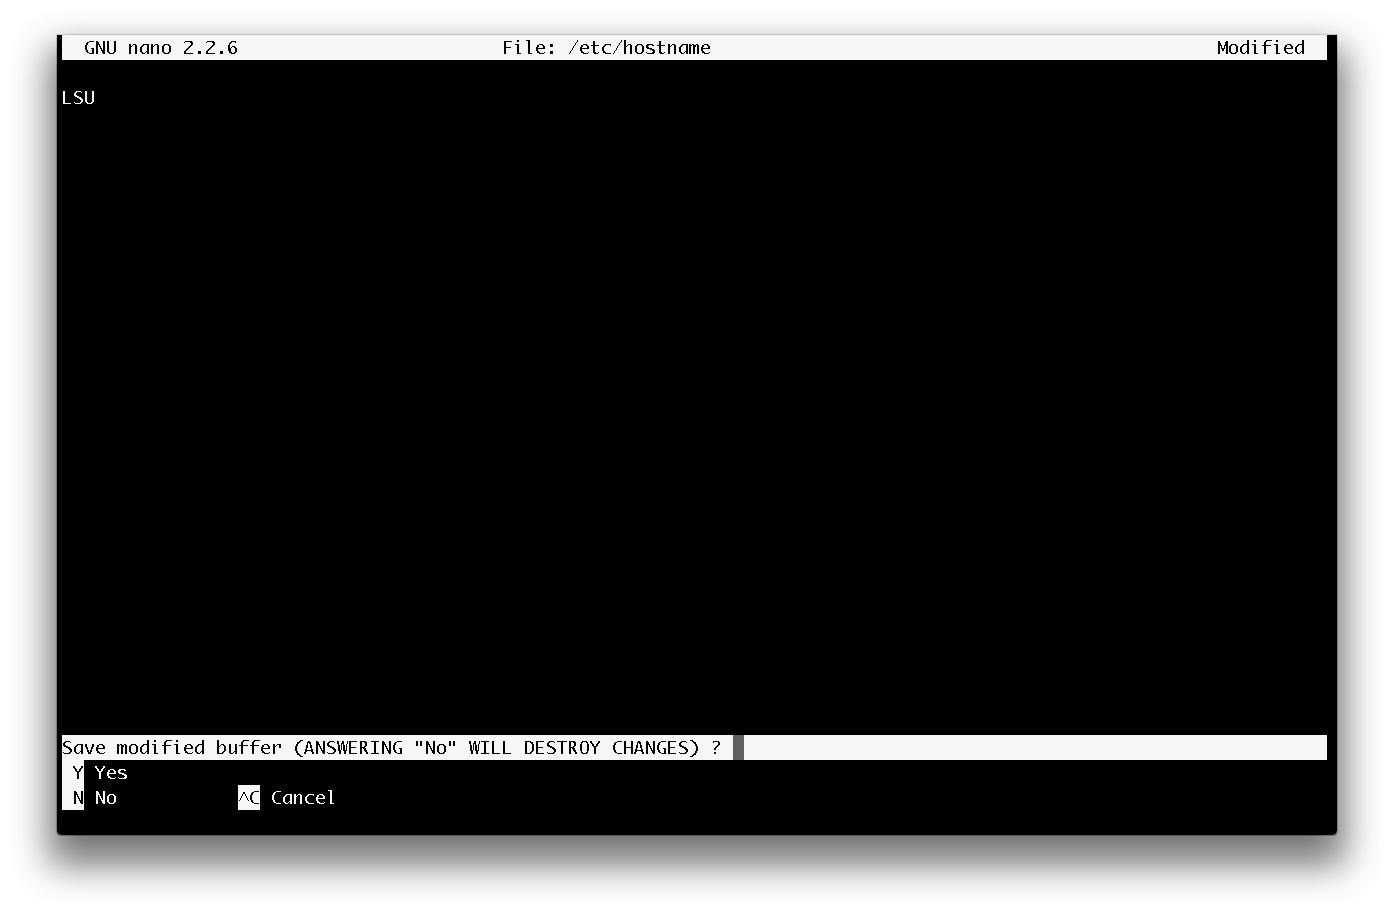
Then, press “Ctrl+x” to exit from the file and press “Y” to save the edited content, as shown above. Then you must give a system reboot for the changes to come into effect.
# sudo reboot
The system reboots starting with the following message,
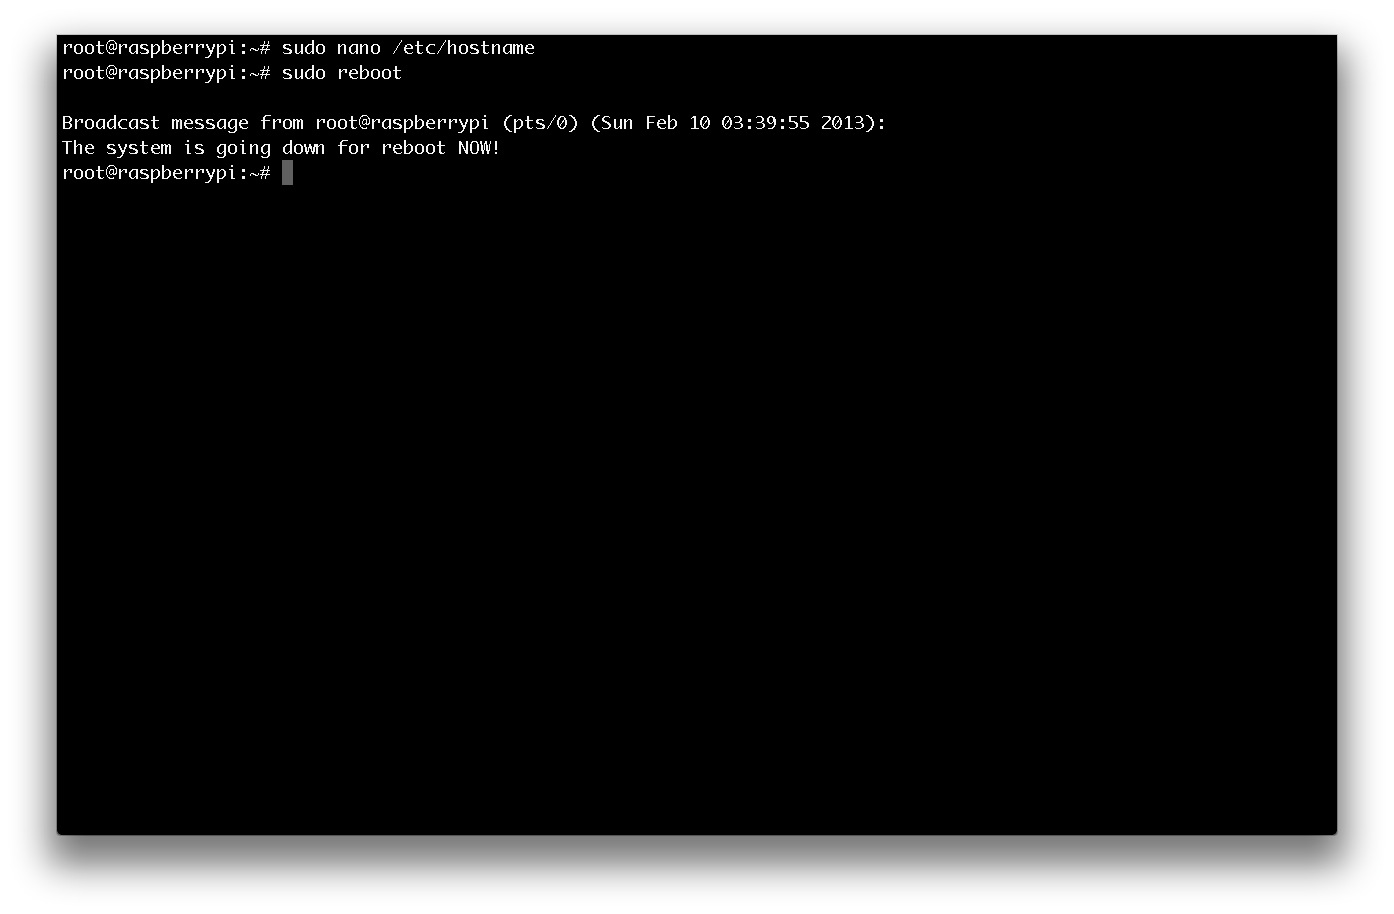
Then wait for the login. There on, you will see the hostname of your Raspberry Pi changed to the new one.

Setting up a network
Then the first step is to setup a network connection and hence web browsing capability. Therefore, open the interfaces configuration file at /etc/network/interfaces using the command below.
# sudo nano /etc/network/interfaces

This displays its contents in the Nano text editor. Here, the network IP address, routing information, default routes and many other information can be given. Editing the content to below, configures the network.
#autoconfigure the eth0 interface
auto eth0
#the loopback network interface
auto lo
#for a static network
iface eth0 inet static
address 10.17.12.182
netmask 255.255.248.0
gateway 192.248.17.90
nameserver 192.248.17.81
nameserver 192.248.17.82
nameserver 192.248.18.91

What comes after auto, which stands for “autoconfigure”, are the interfaces needed to be brought up at the boot time.
eth0– ethX is how an Ethernet port is defined, where X=0, 1 … and eth0 port connects internal LAN devices while the others usually comes to use for external internet connections.lo– Loopback networking interface which keeps data packets route in a loop.
Rest of the lines is set for a network configured statically. (DHCP network cards require only one line, iface eth0 inet dynamic) This is where the IP address, netmask, gateway, and nameservers (can have multiple nameservers if there are backups but only one will be used) are configured. Then give a networking restart for the configured information to be active.
# sudo /etc/init.d/networking restart
Then wait until it completes.
Or a system reboot would do the same.
# sudo reboot
Setting-up SSH connection
SSH connection is a secure method of logging into a remote computer(in this case a Raspberry pi). Its recommended to use ssh connection for RPi because it save RAM space from not loading GUI (desktop) and also using ssh can do almost everything you expect from RPi except Gaming 😉 .
As mentioned earlier after creating network interface, the raspberry pi can access remotely using any other computer connected to the same network.
how to access RPi through ssh connection.
- First you need to enable ssh enable server using RPi configuration.
Goto ssh menu and then select <Enable>

Select ssh connection in raspi-config menu
Then select <Enable> and then it will show “ssh server enable” then select <yes>.
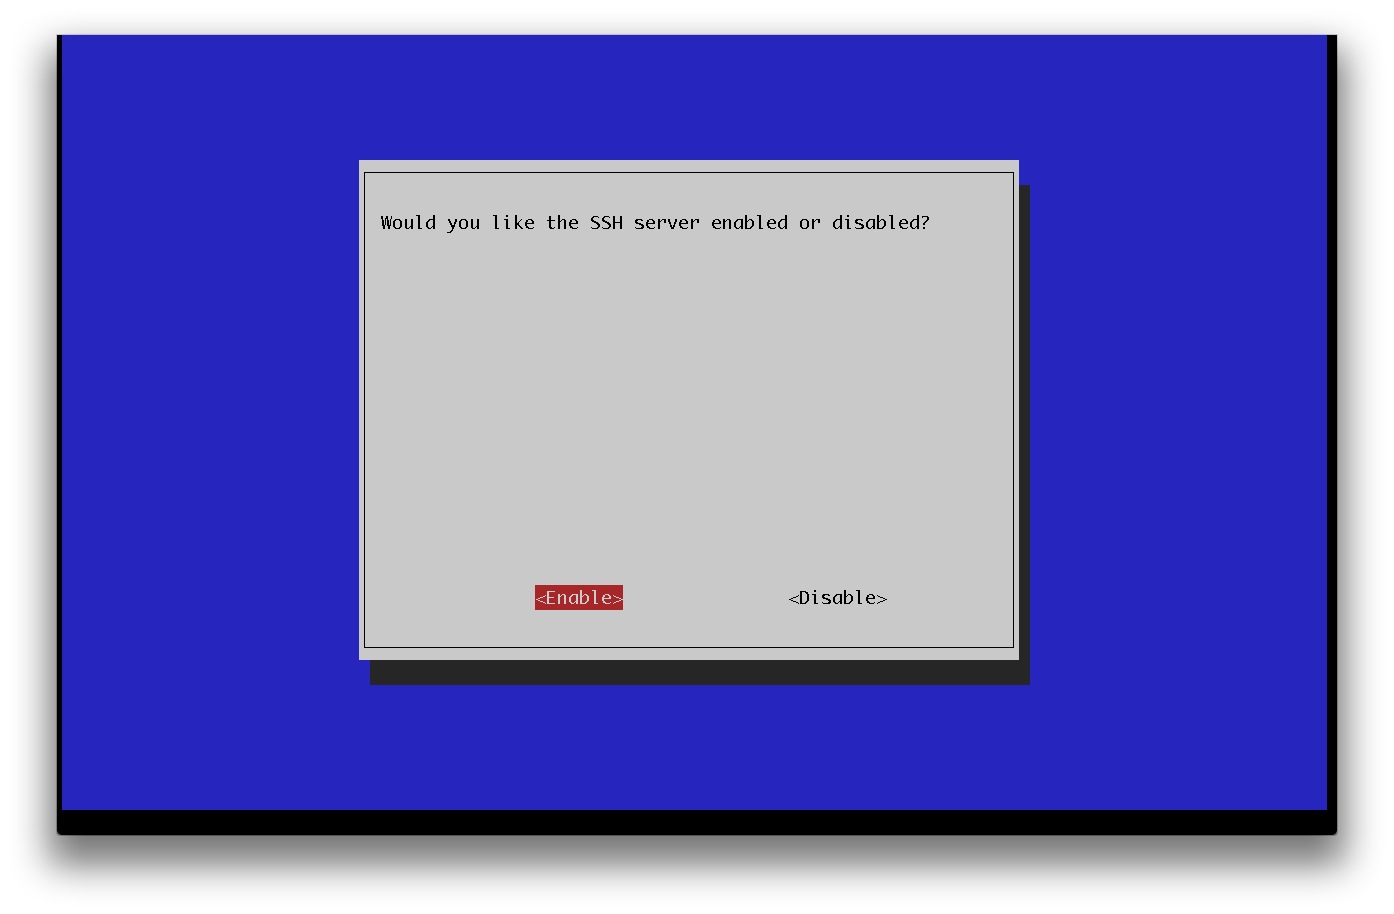
Enable the ssh server

ssh server enabled massage
Then goto boot_behaviour menu and select <No> because you dont need desktop anymore when you access RPi using ssh and this will save some amount of RAM space.

selecting boot behaviour in rasi-config menu
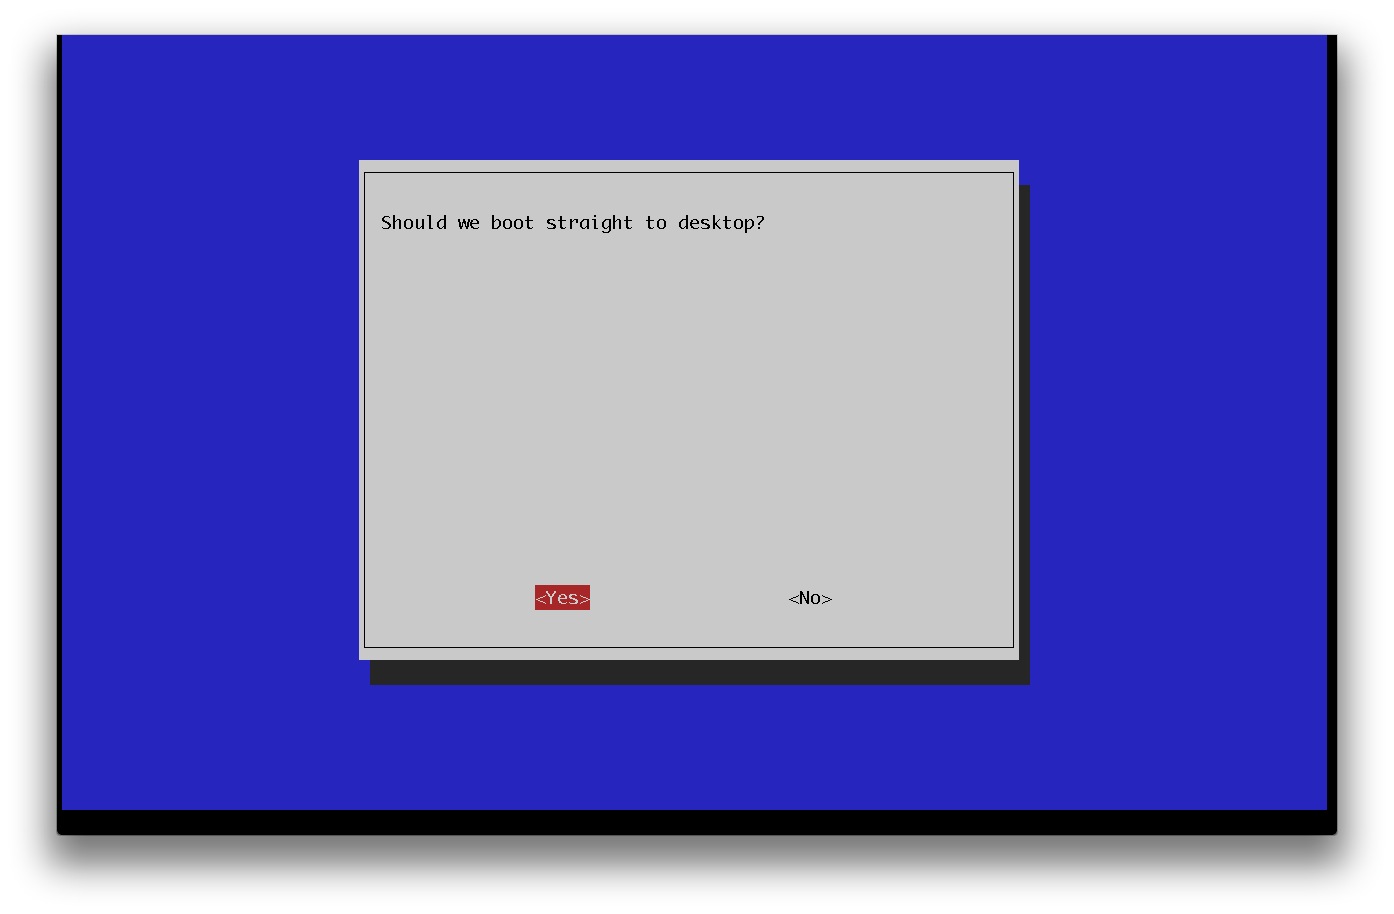
select “NO” option
finally config menu asks for a reboot accept it and after that you can remotely access the RPi.

confirm reboot select “Yes”
2. If you are a windows user download PuTTY (this is a recommended software to remote access for windows users).
3. If you are a mac OS X user or Linux user you can access it through “Terminal” wich pre installed in your OS. Type following command in Terminal “ssh <user_name>@<your RPi IP address>”. Here root was selected as user because to setup RPi properly need to perform some installing steps which need super user permissions.
ssh root@10.17.12.182

Accessing Raspberry pi remotely using ssh connection
Then type your password to log into RPi.( when you type password in terminal it doesn’t show charaters this is normal just type your password normally.) Then it will show that you successfully logged into RPi.
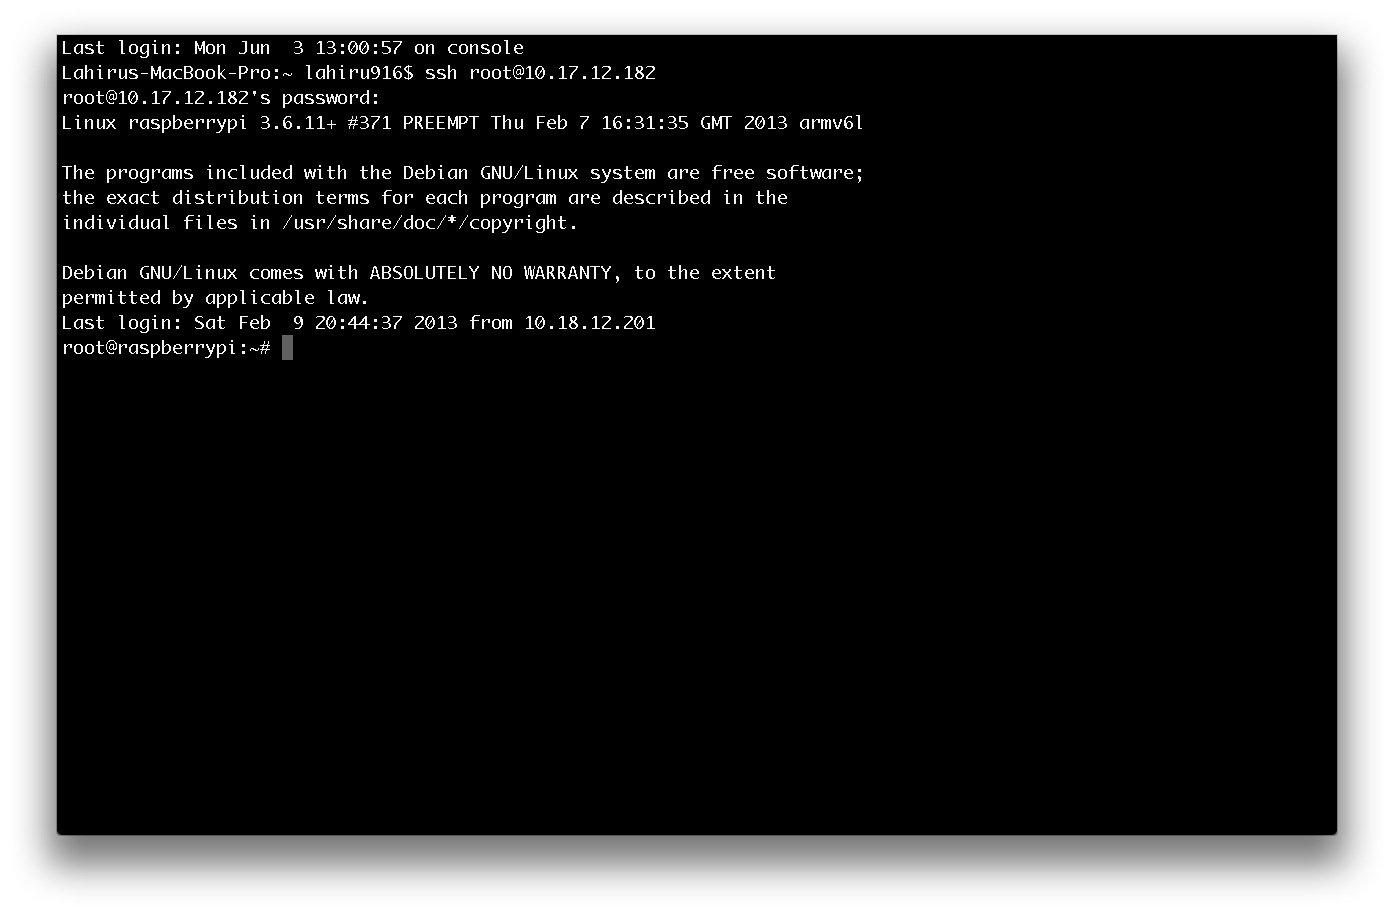
Successfully logged into RPi.
Note: This point onwards, any other computer using the same network can access the same Raspberry Pi board through Terminal programs. The user may disconnect the GUI and any other I/O component connected, leaving only the network cable and the power cable plugged in.
Note: Setting up a password and setting up a hostname can also be done after setting up SSH and through another computer. But there can be a conflicting situation if another Raspberry Pi is connected to the same network. Therefore, it is safer to change them at the beginning.
Setting up proxy
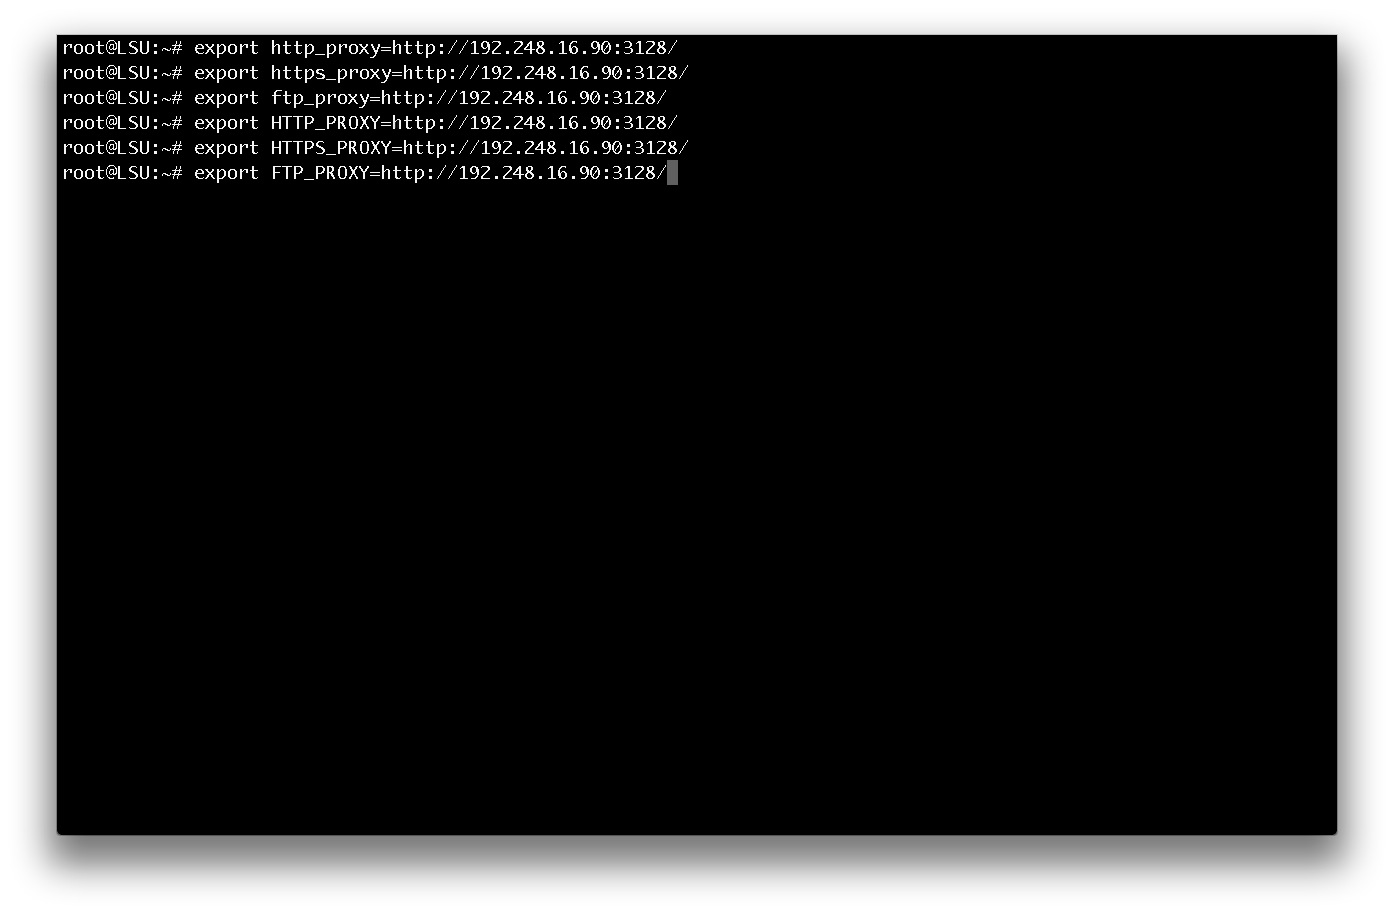
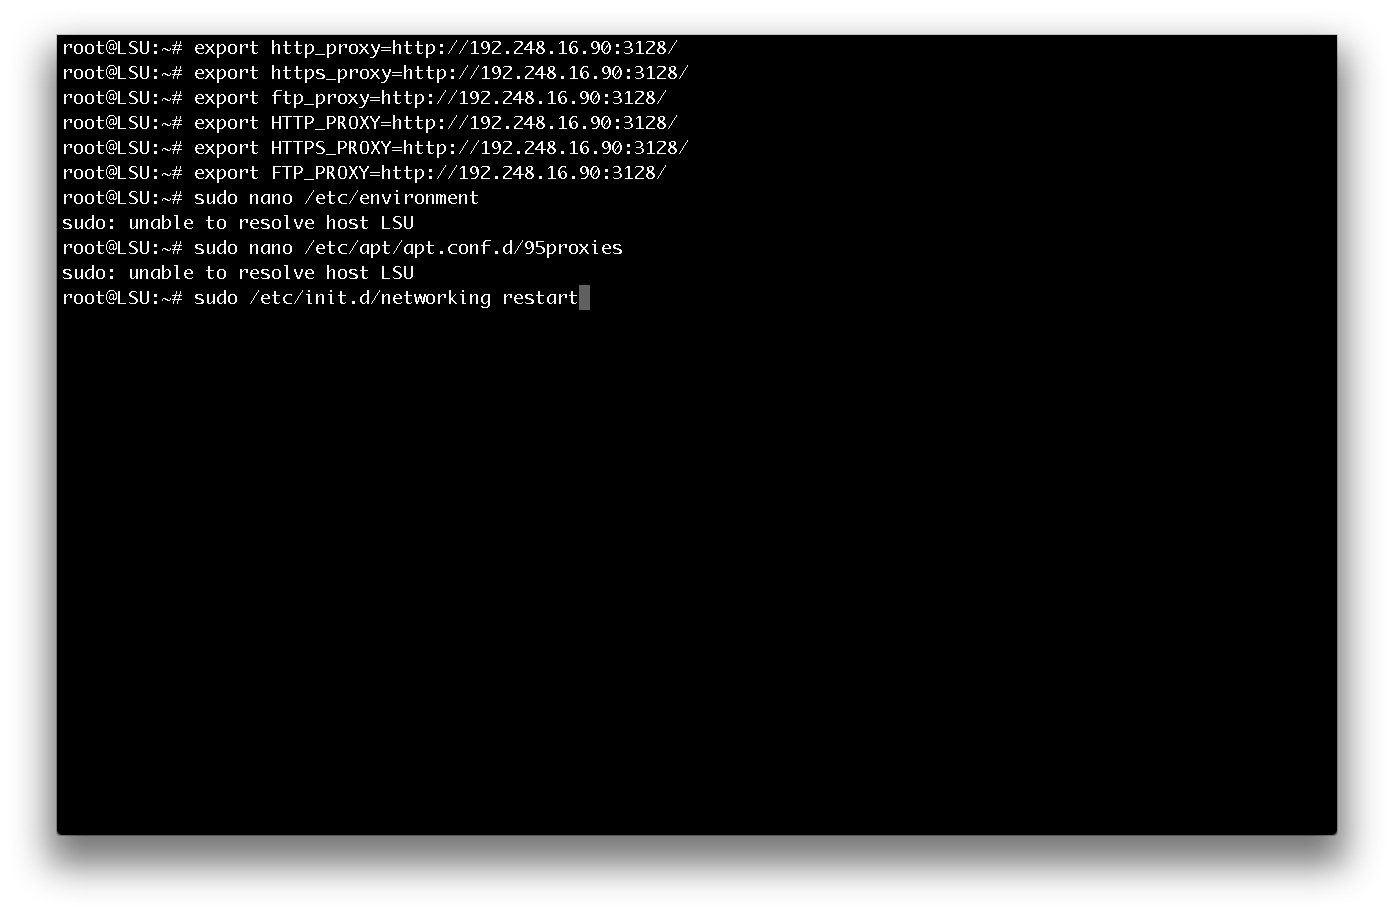
Linux programs use environment variables to determine the proxy for a protocol such as http and ftp. Therefore, set these variables in order to set the proxy server and access internet. These variables are of the form ‘http_proxy ‘. Following are the commands,
# export http_proxy=http://192.248.16.90:3128/
# export https_proxy=http://192.248.16.90:3128/
# export ftp_proxy=http://192.248.16.90:3128/
# export HTTP_PROXY=http://192.248.16.90:3128/
# export HTTPS_PROXY=http://192.248.16.90:3128/
# export FTP_PROXY=http://192.248.16.90:3128/
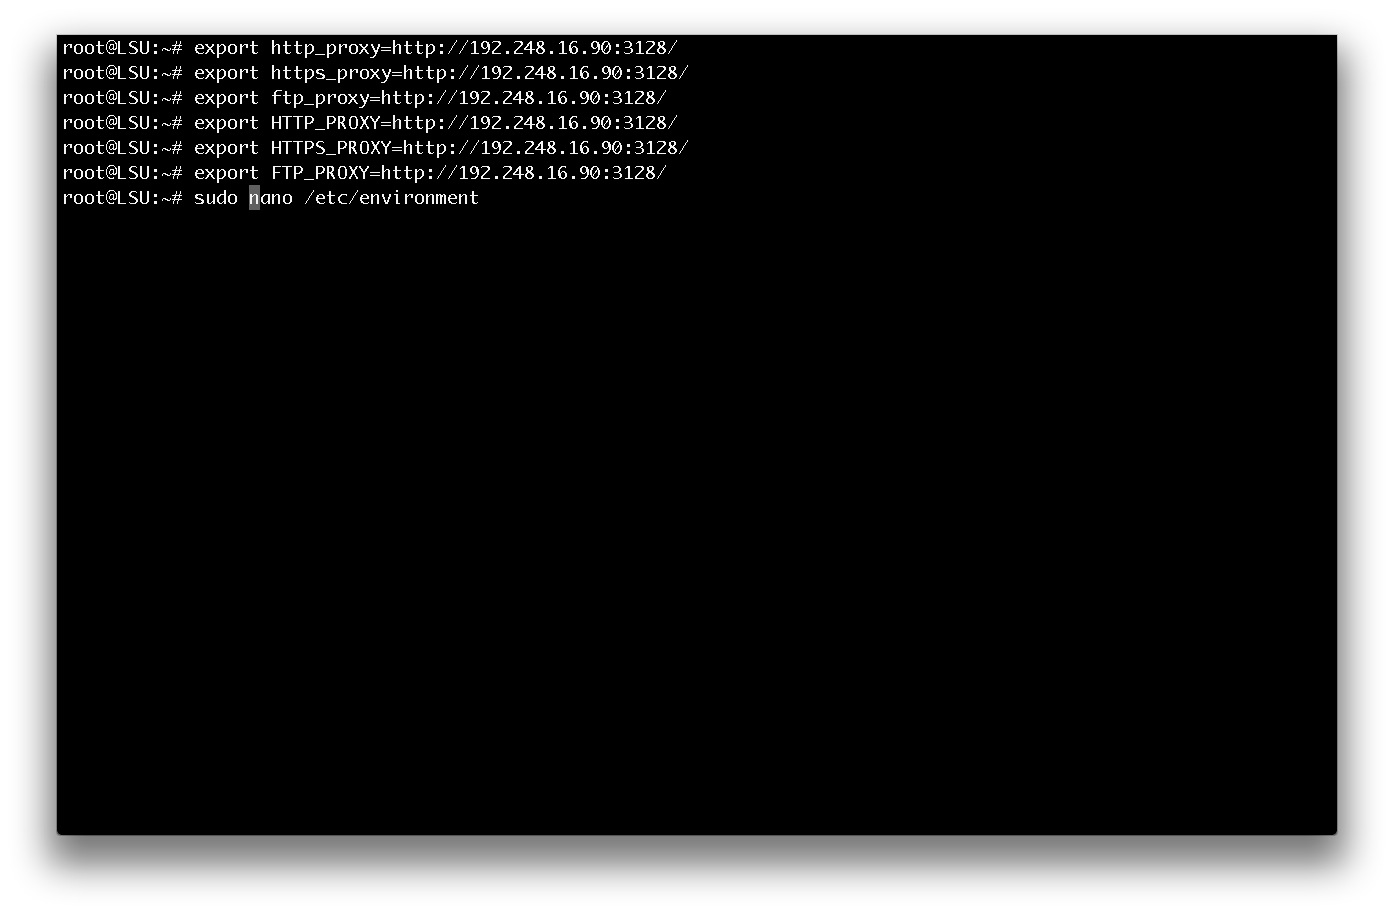
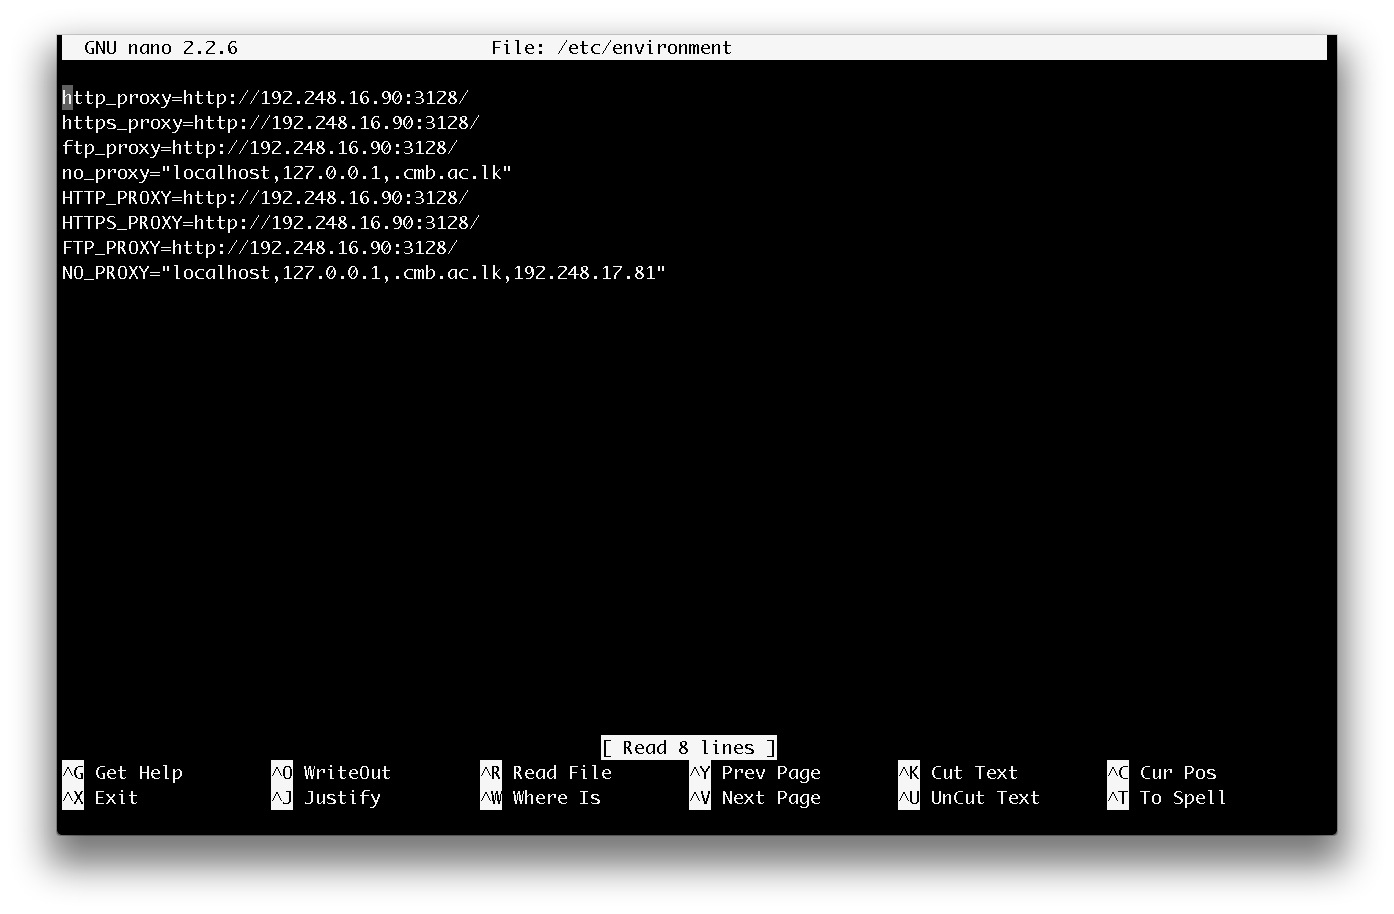
Therefore, environment file at /etc/environment, which consists system-wide environment variable settings, should be edited by adding the above variables.
# sudo nano /etc/environment
Edit this file into,
export http_proxy=http://192.248.16.90:3128/
export https_proxy=http://192.248.16.90:3128/
export ftp_proxy=http://192.248.16.90:3128/
no_proxy=”localhost, 127.0.0.1, cmb.ac.lk”
export HTTP_PROXY=http://192.248.16.90:3128/
export HTTPS_PROXY=http://192.248.16.90:3128/
export FTP_PROXY=http://192.248.16.90:3128/
NO_PROXY=”localhost, 127.0.0.1, cmb.ac.lk, 192.248.17.82”
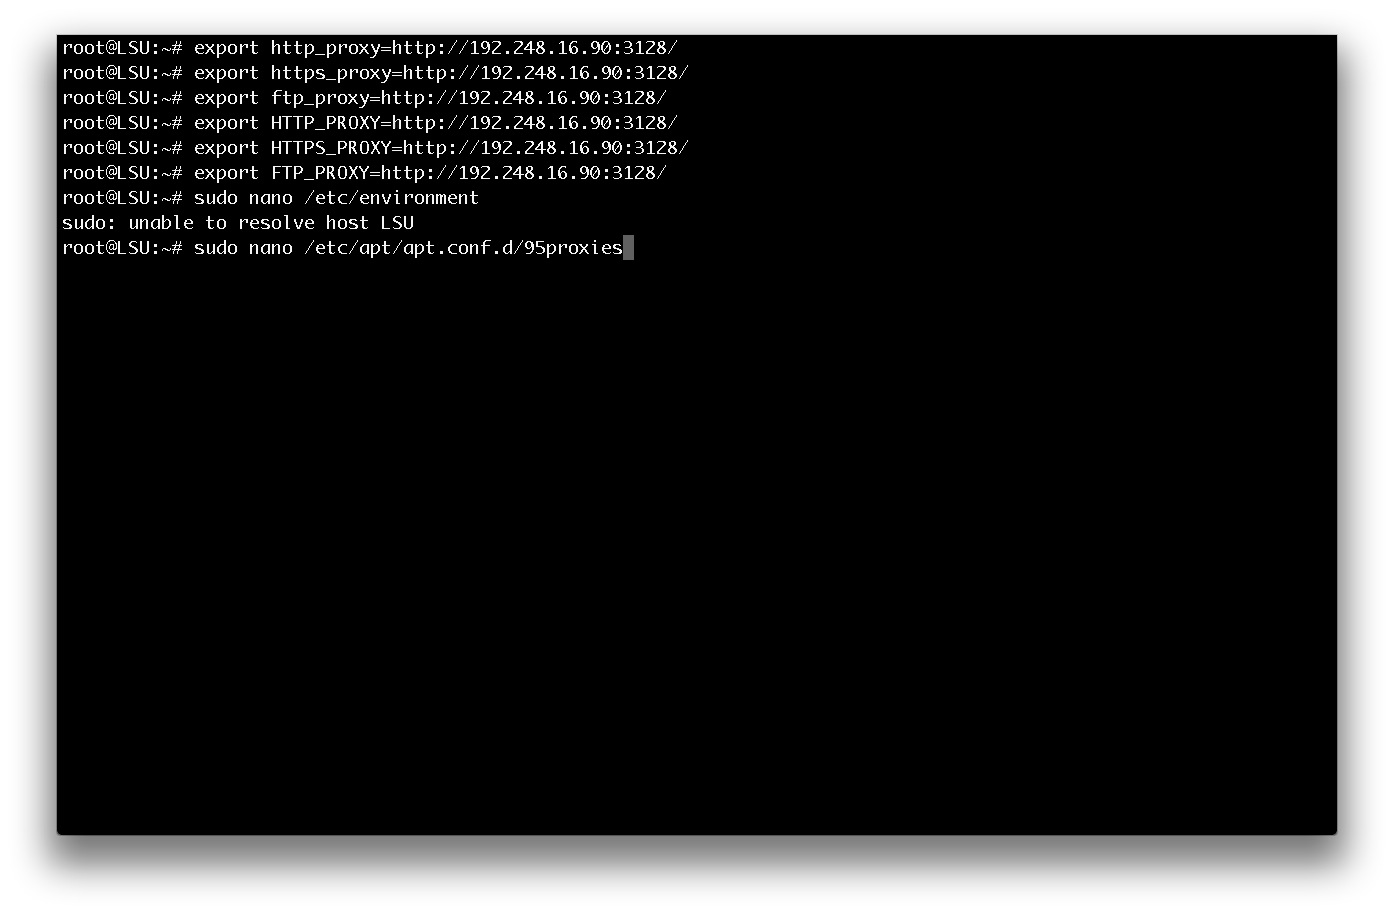
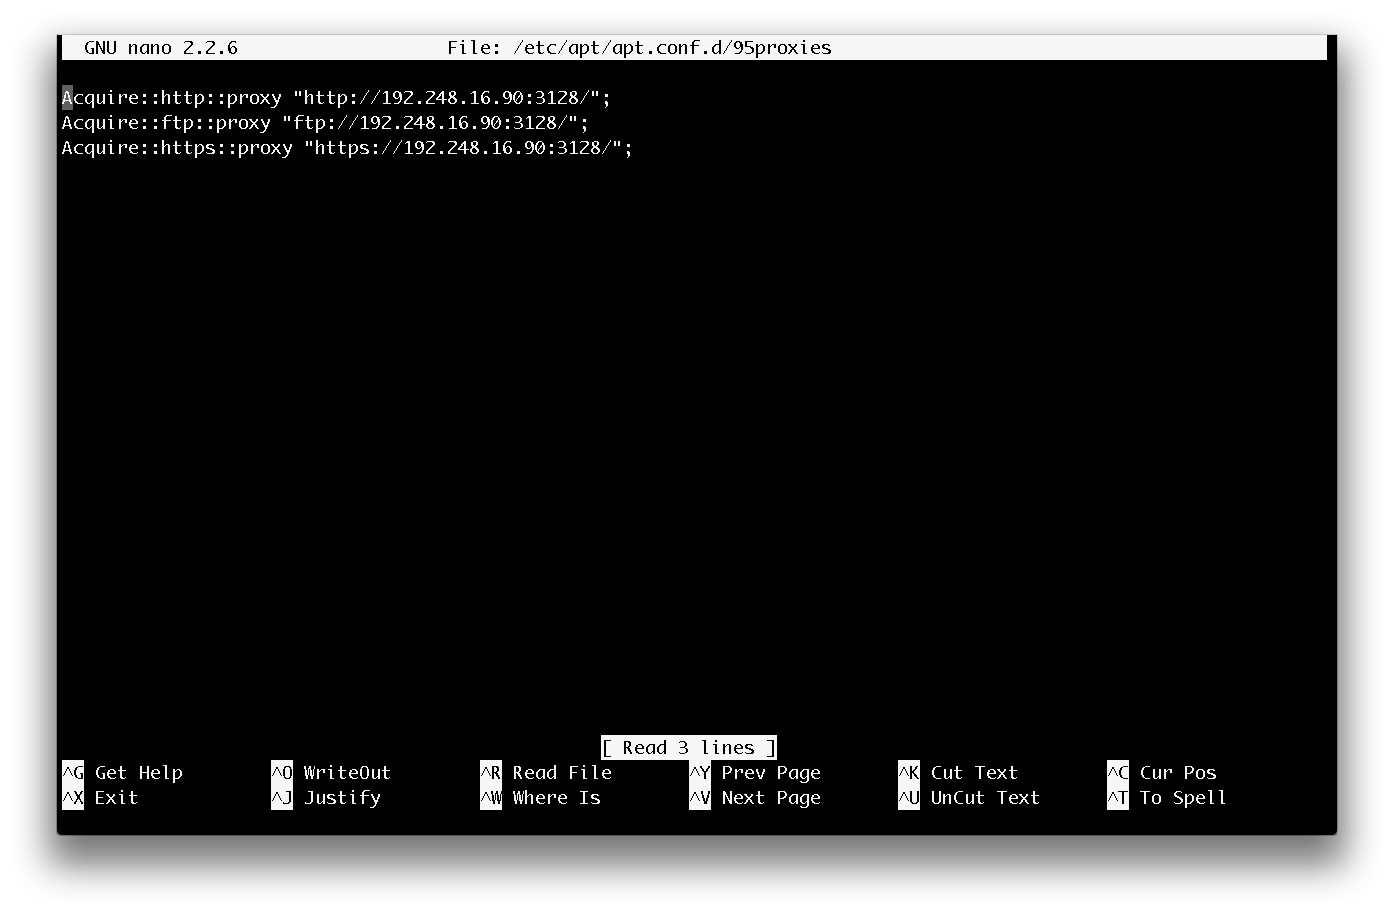
Some programs that are used (e.g. apt-get) are benefited by setting system-wide environment variables. But these programs could still give errors for not obeying system-wide proxy settings. For that, a new file called 95proxies is created at /etc/apt/apt.conf.d/,
# sudo nano /etc/apt/apt.conf.d/95proxies
and the following are included,
Acquire::http::proxy “http://192.248.16.90:3128/”
Acquire::ftp::proxy “ftp://192.248.16.90:3128/”
Acquire::https::proxy “https://192.248.16.90:3128/”
Then, restart networking,
# sudo /etc/init.d/networking restart
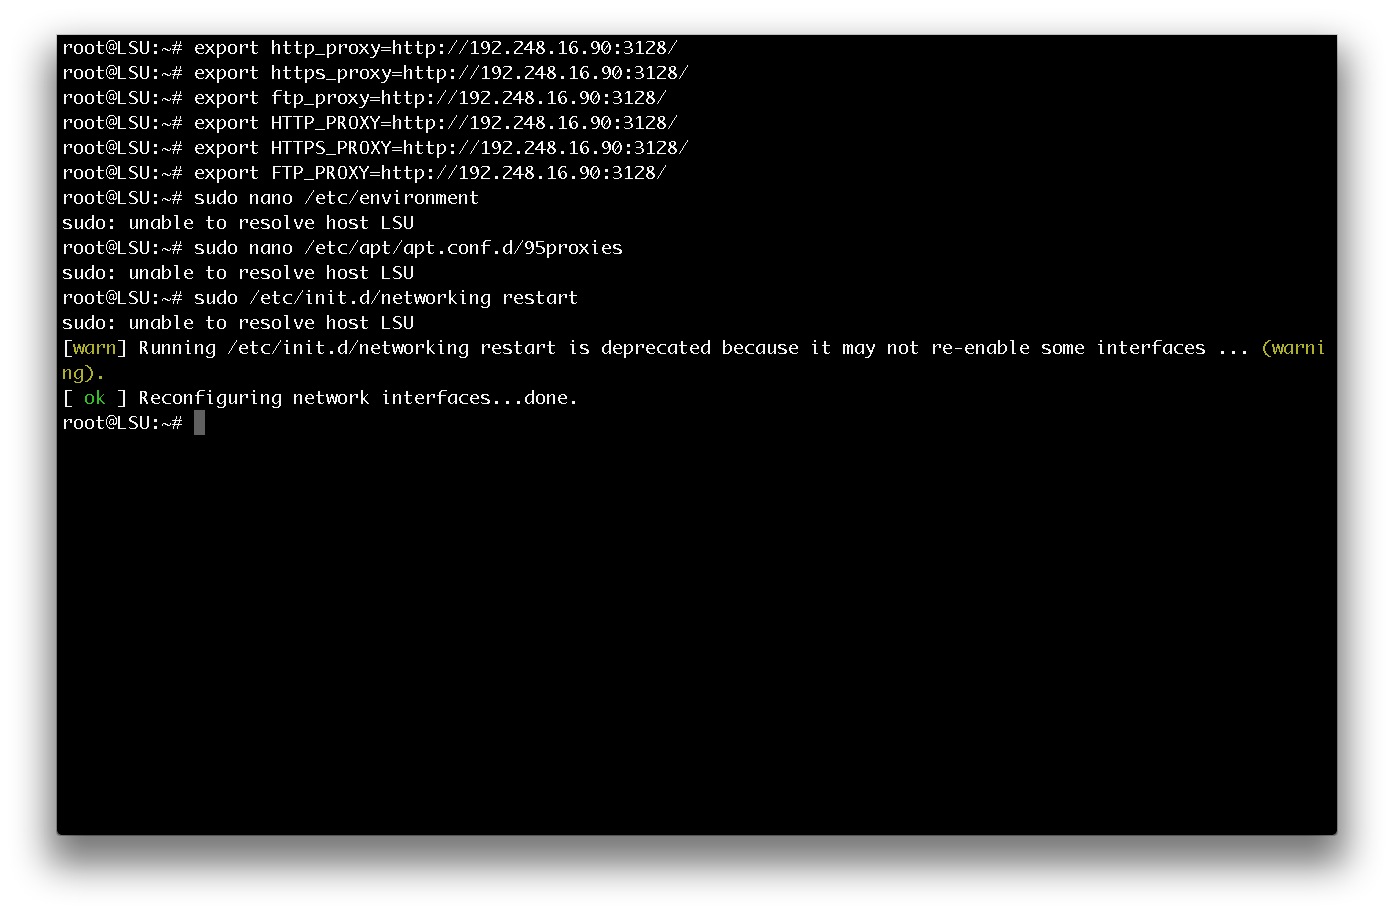
or restart the system for changes to come into effect.
# sudo reboot
Setting-up Raspberry Pi
In previous sections we manage to install raspbian wezzy operating system and configure remote access to RPi successfully. Now to setup raspberry pi properly first need to update software and hardware.
To update repository information type the following command in your terminal.
# sudo apt-get update

To update packages type,
# sudo apt-get upgrade

Then installing manu ask to confirm to continue, type “y” in the terminal.

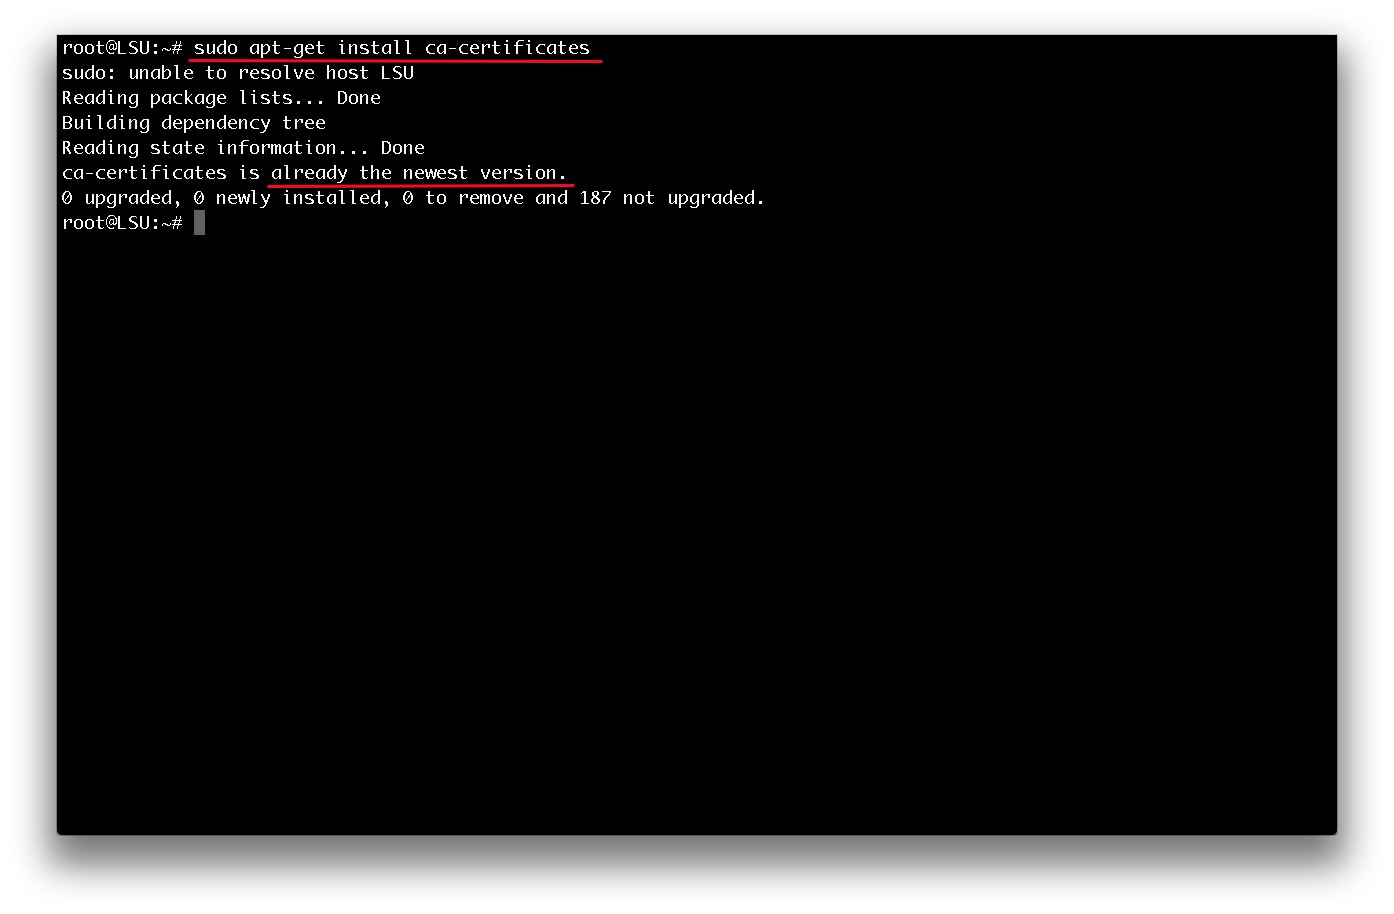
To install certificates.(normally these certificates are up-to date but better to run this agin to make sure its up-to date.)
# sudo apt-get install ca-certificates
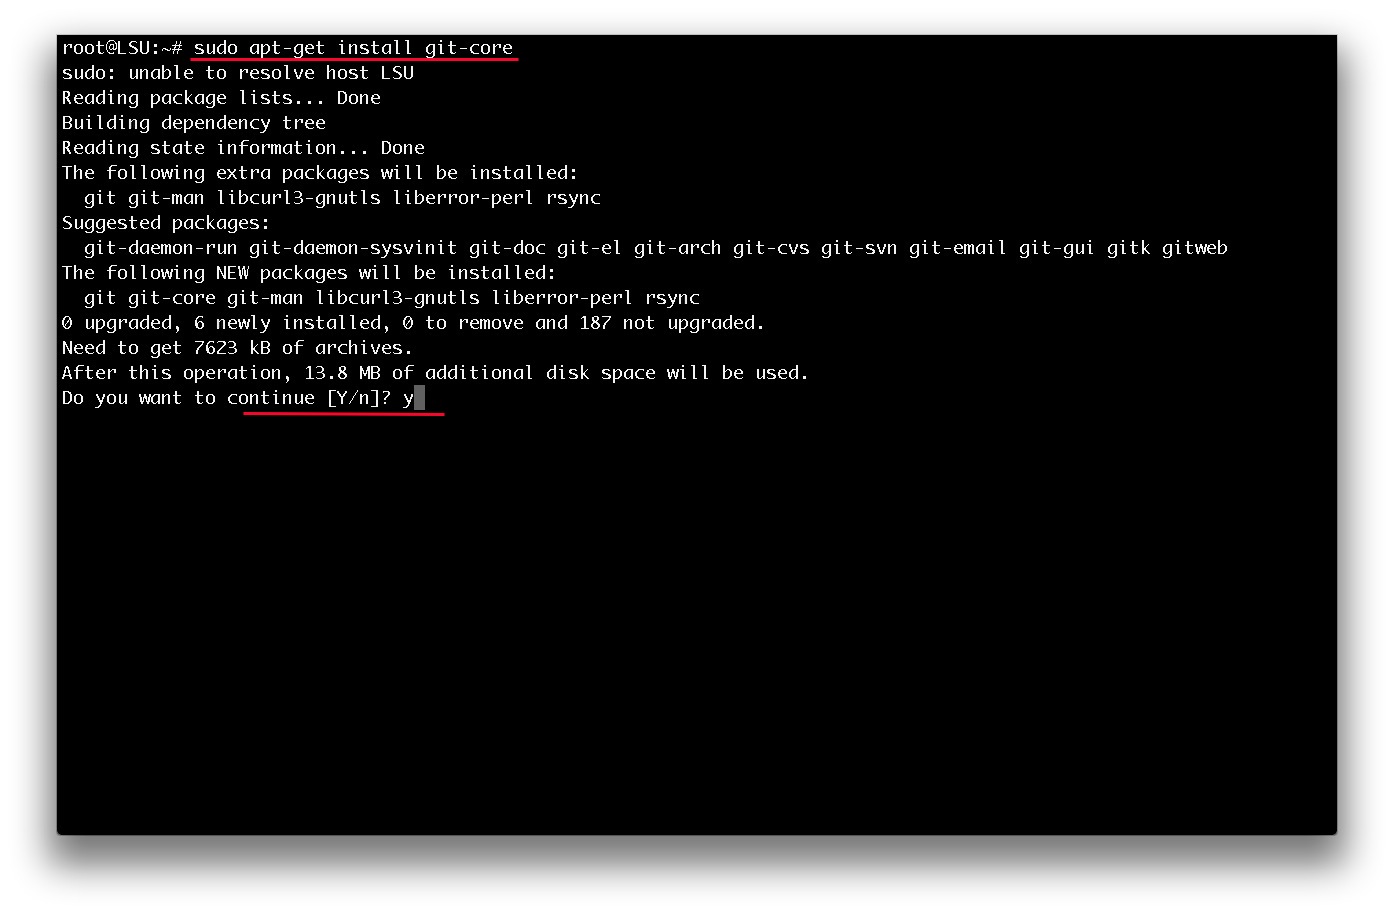
To install git-core
# sudo apt-get install git-core
then type “y” to continue installation.
To update firmware first download it type,
# sudo wget http://goo.gl/1BOfJ -O /usr/bin/rpi-update && sudo chmod +x /usr/bin/rpi-update
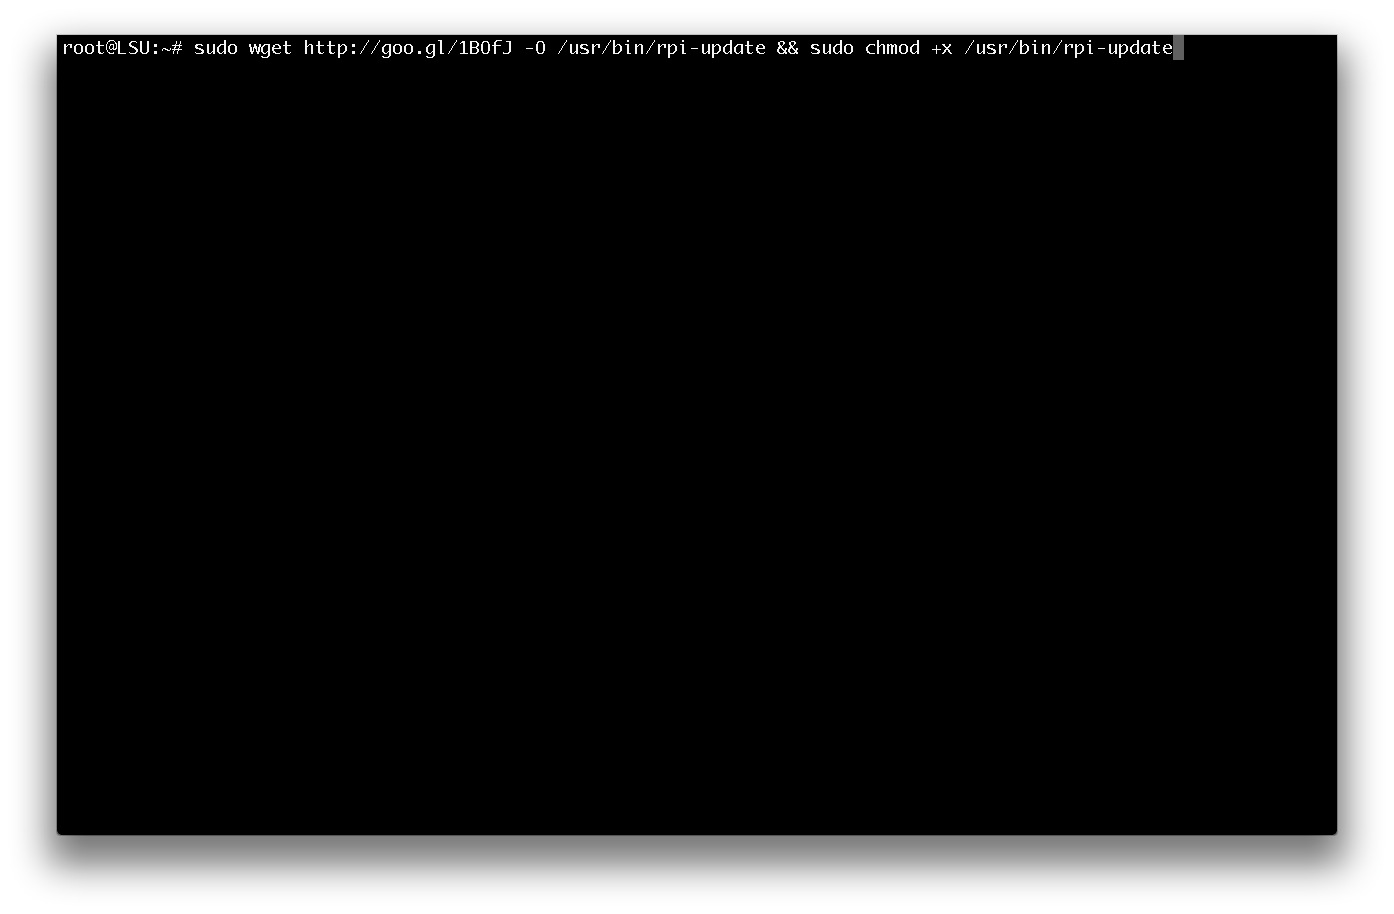
Then to install ‘rpi-update’ type,
# sudo rpi-update

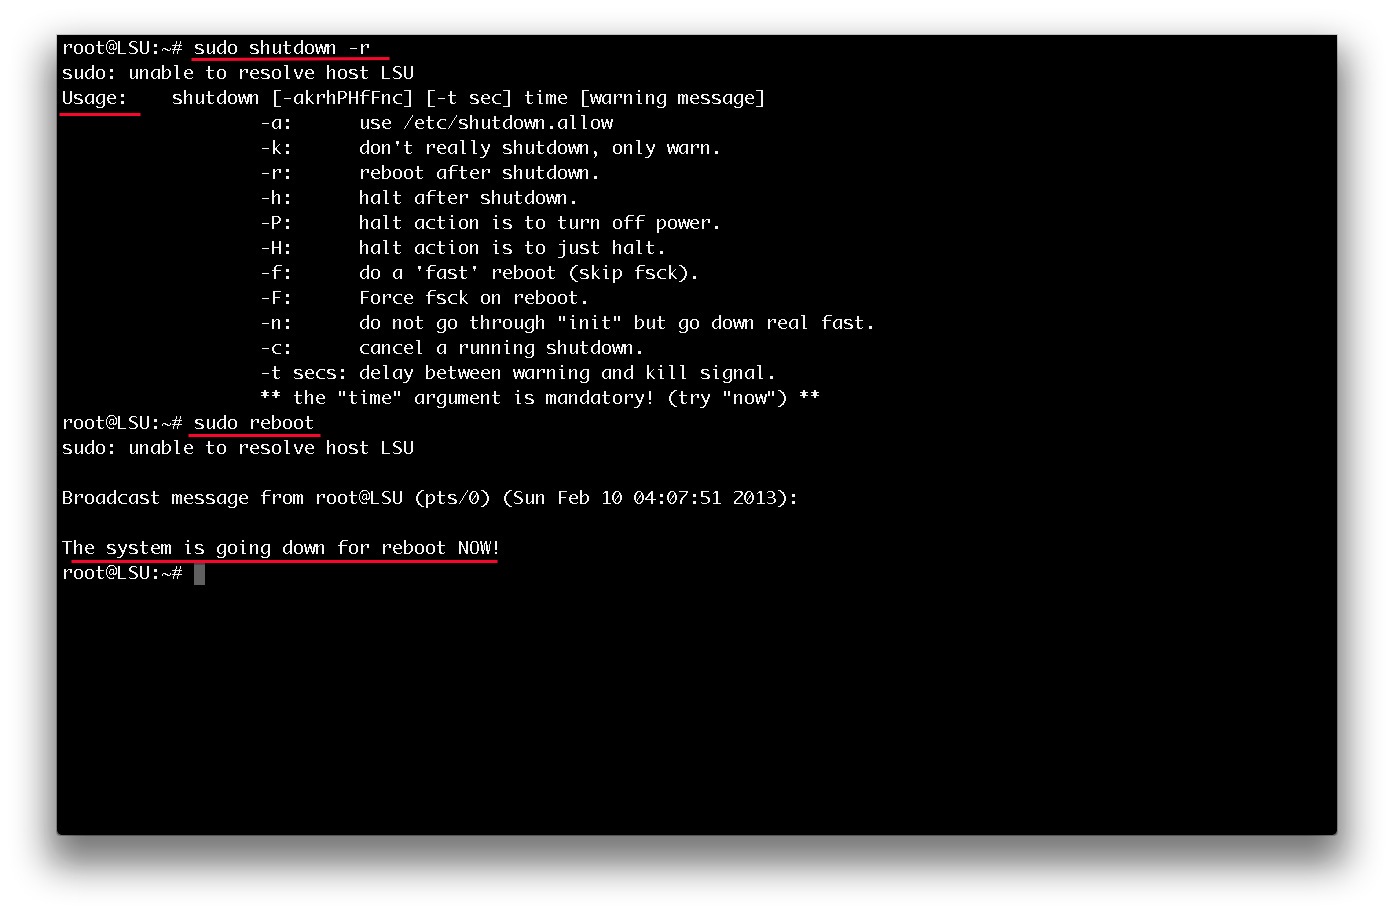
Then reboot the system to effect all the changes to the system type,
# sudo shutdown -r
or
# sudo reboot
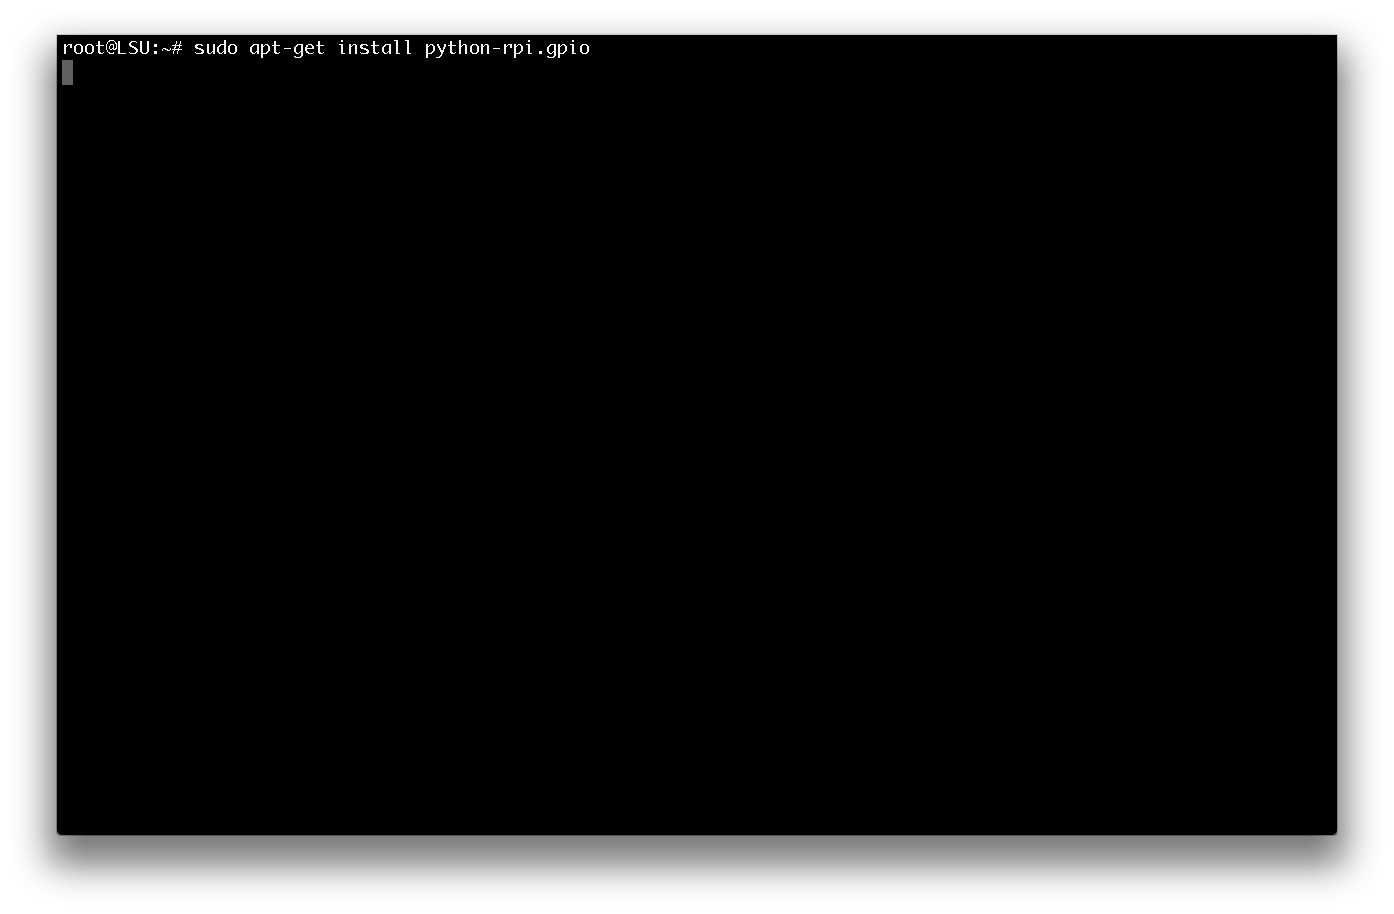
To setting-up GPIO ports and access through using ‘python’ code type,
# sudo apt-get install python-rpi.gpio
Raspberry Pi as a Web Server
Raspberry Pi can setup as a web server following steps shows how to do it step by step.
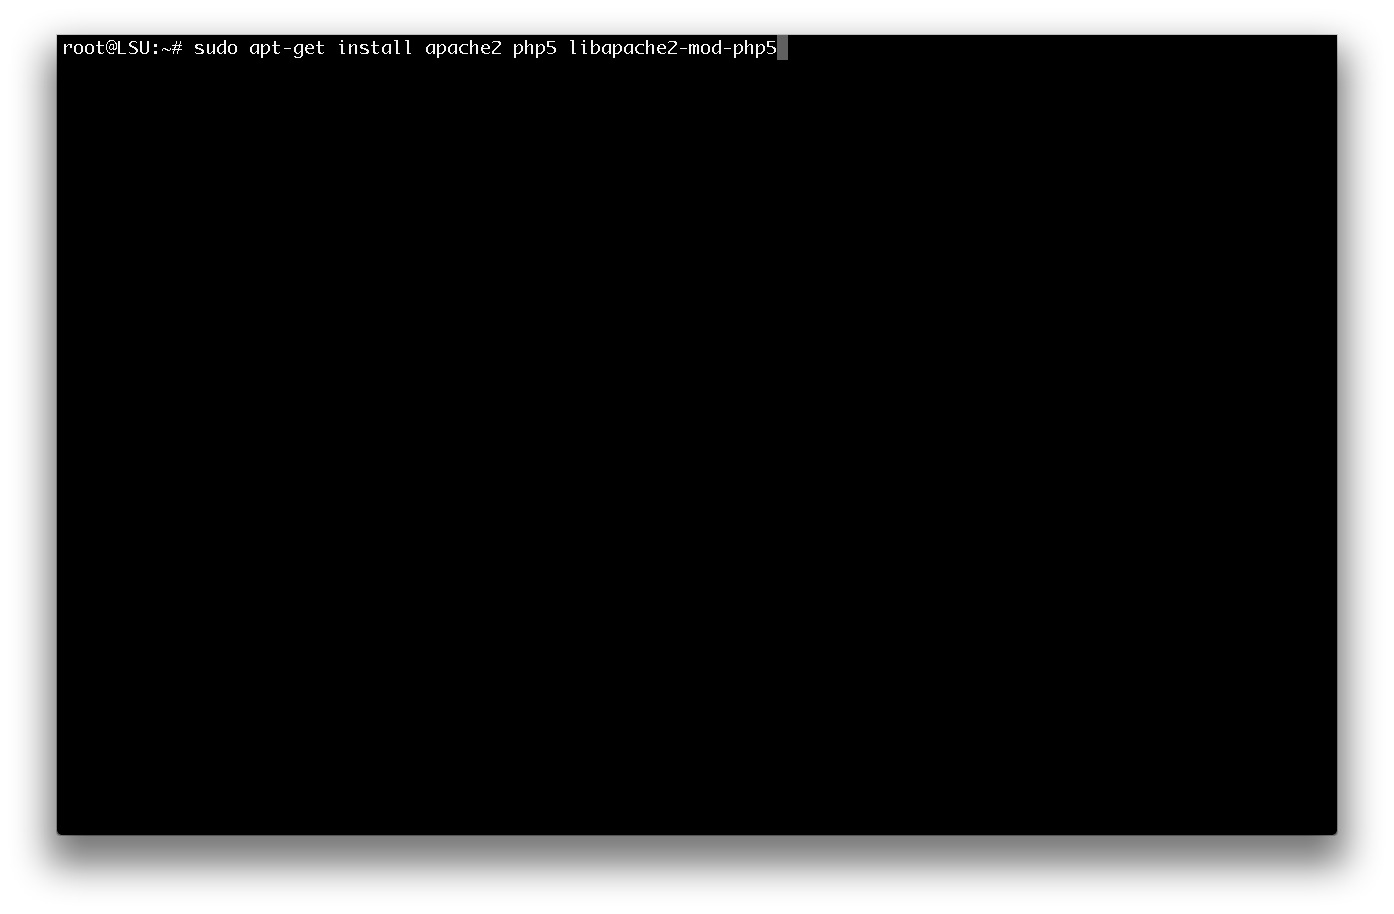
- First install ‘apache’ web server and ‘php’ as a server side scripting language and the connection between ‘apache2 and php’ type,
# sudo apt-get install apache2 php5 libapache2-mod-php5
Then restart the apache2 type,
# sudo service apache restart

or
# sudo service apache2 stop
Then start apache type,
# sudo service apache2 start

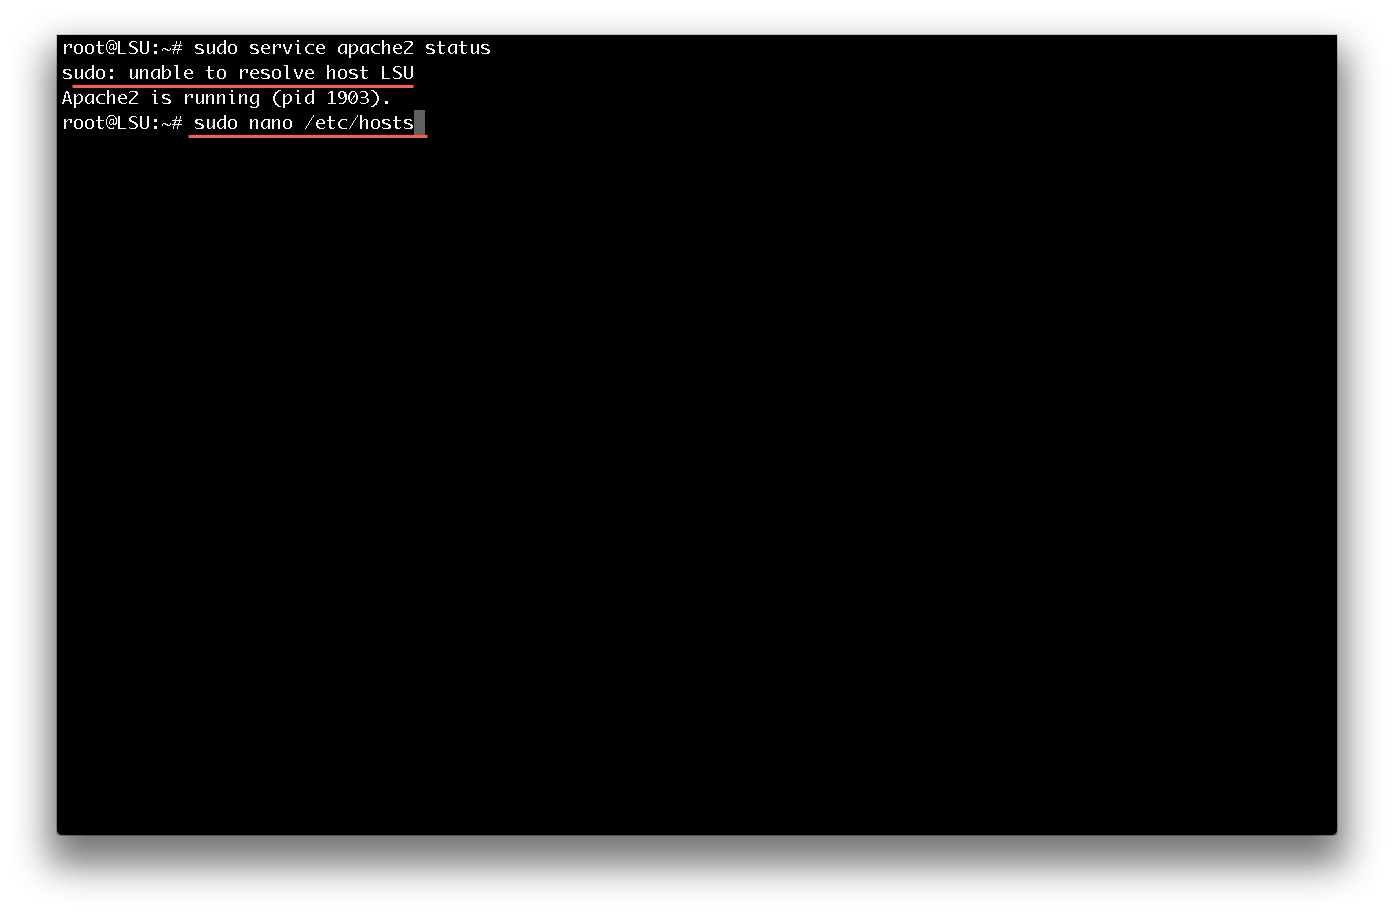
To make sure apache web server working properly type,
# sudo apache2 status

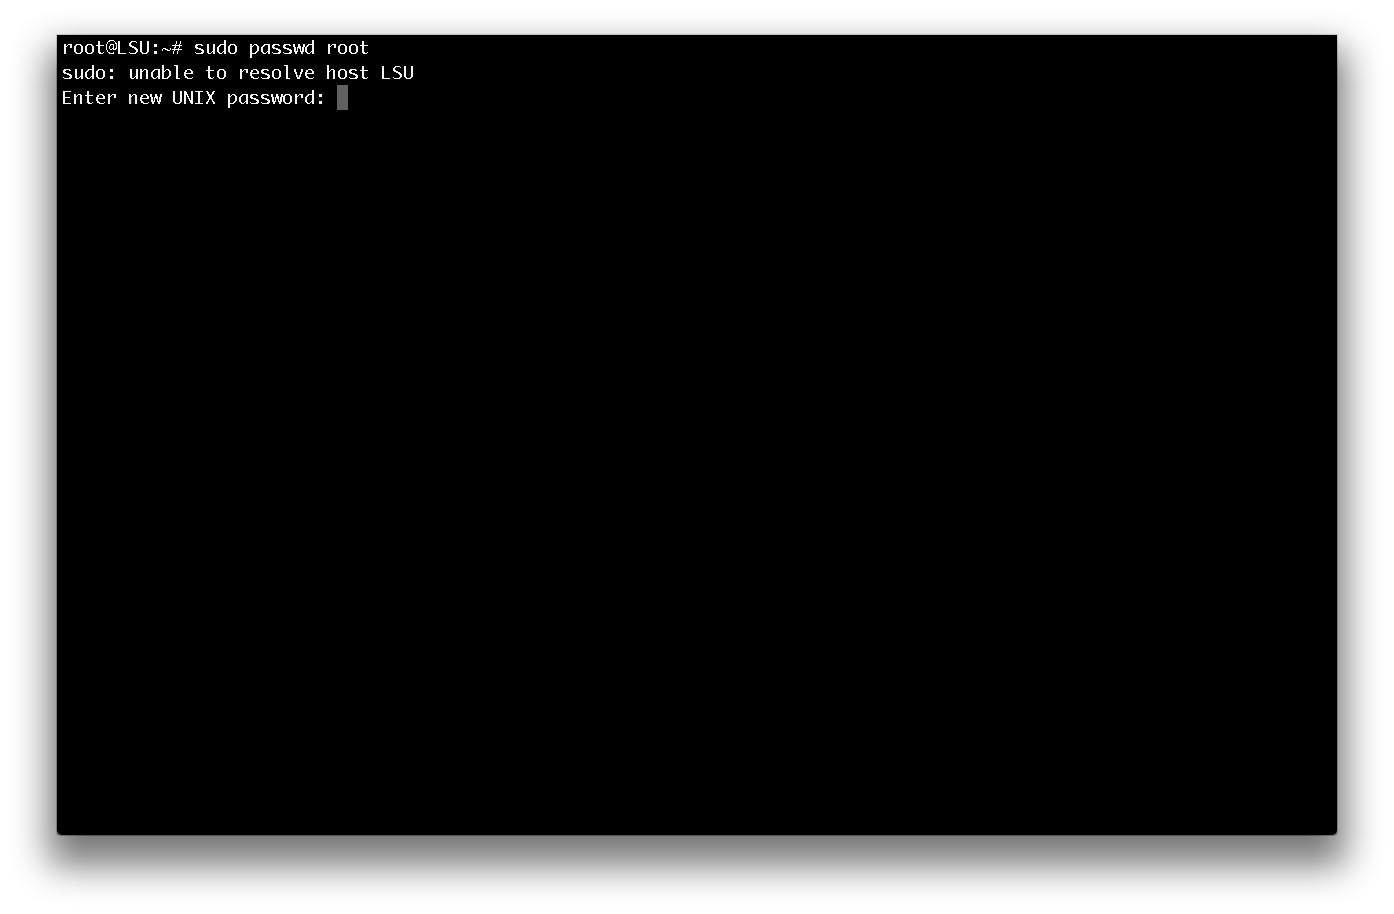
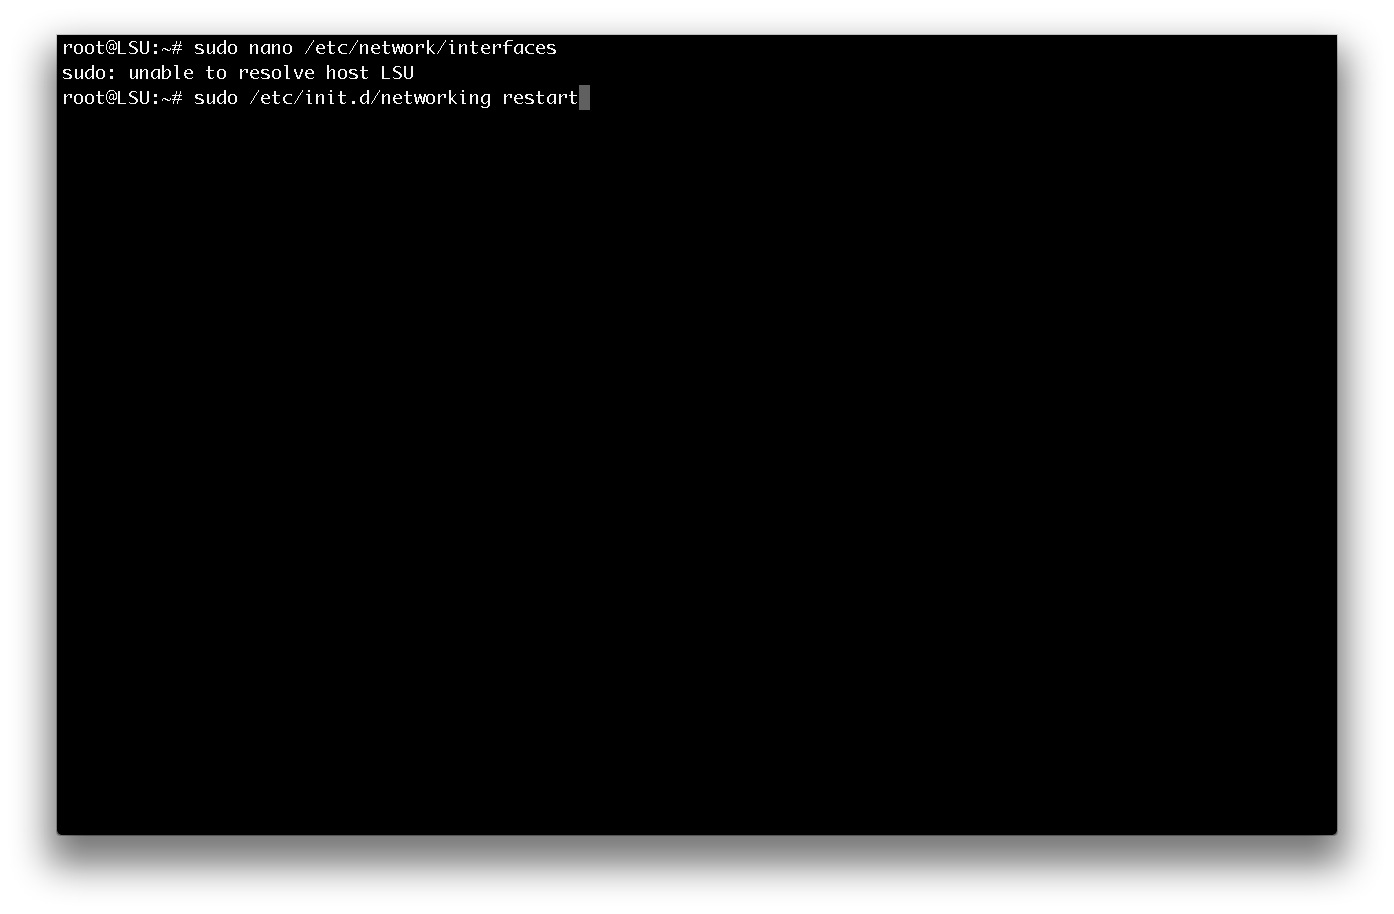
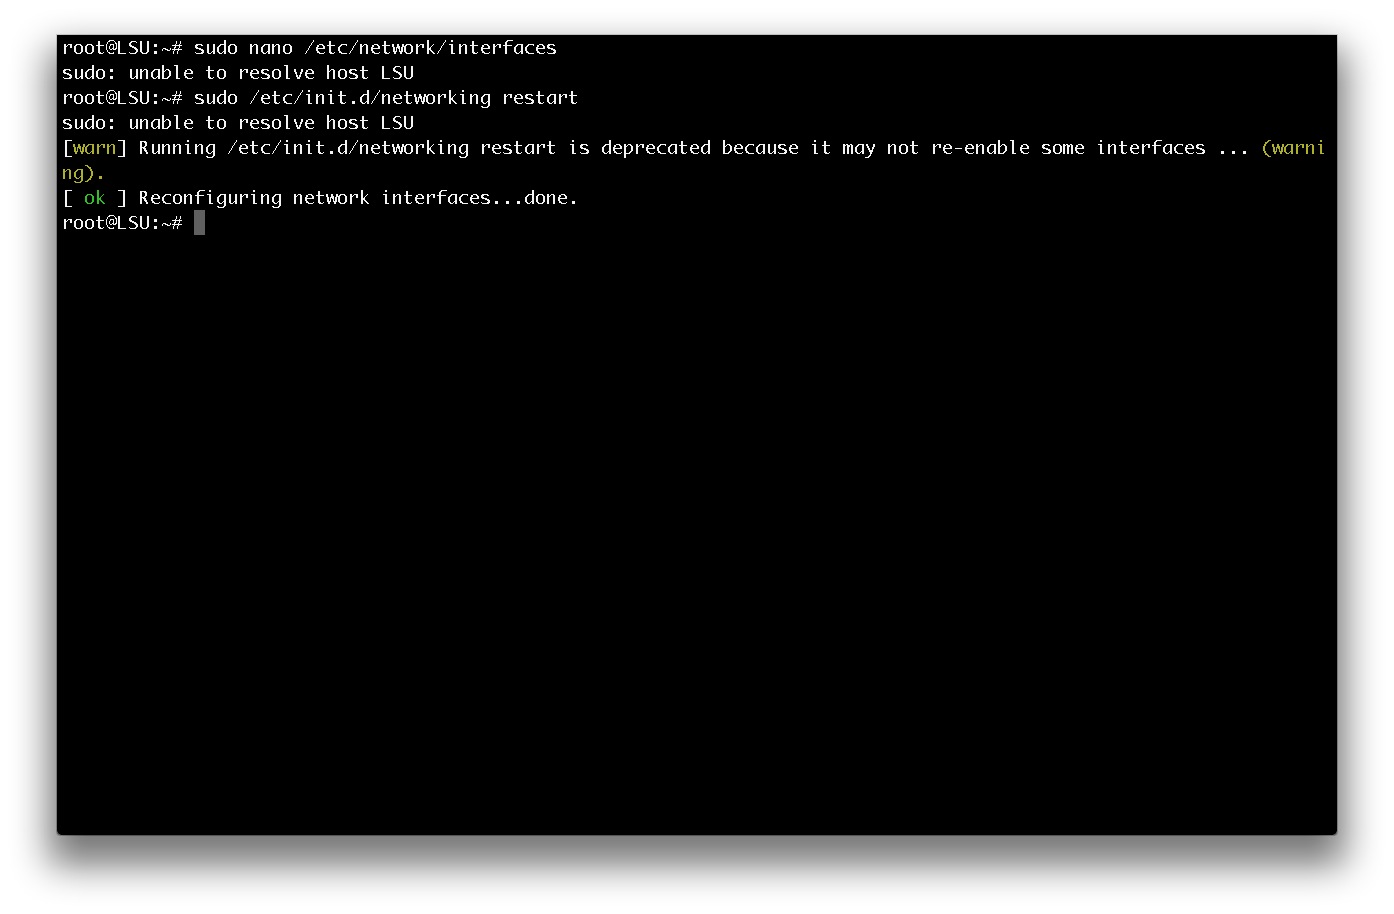
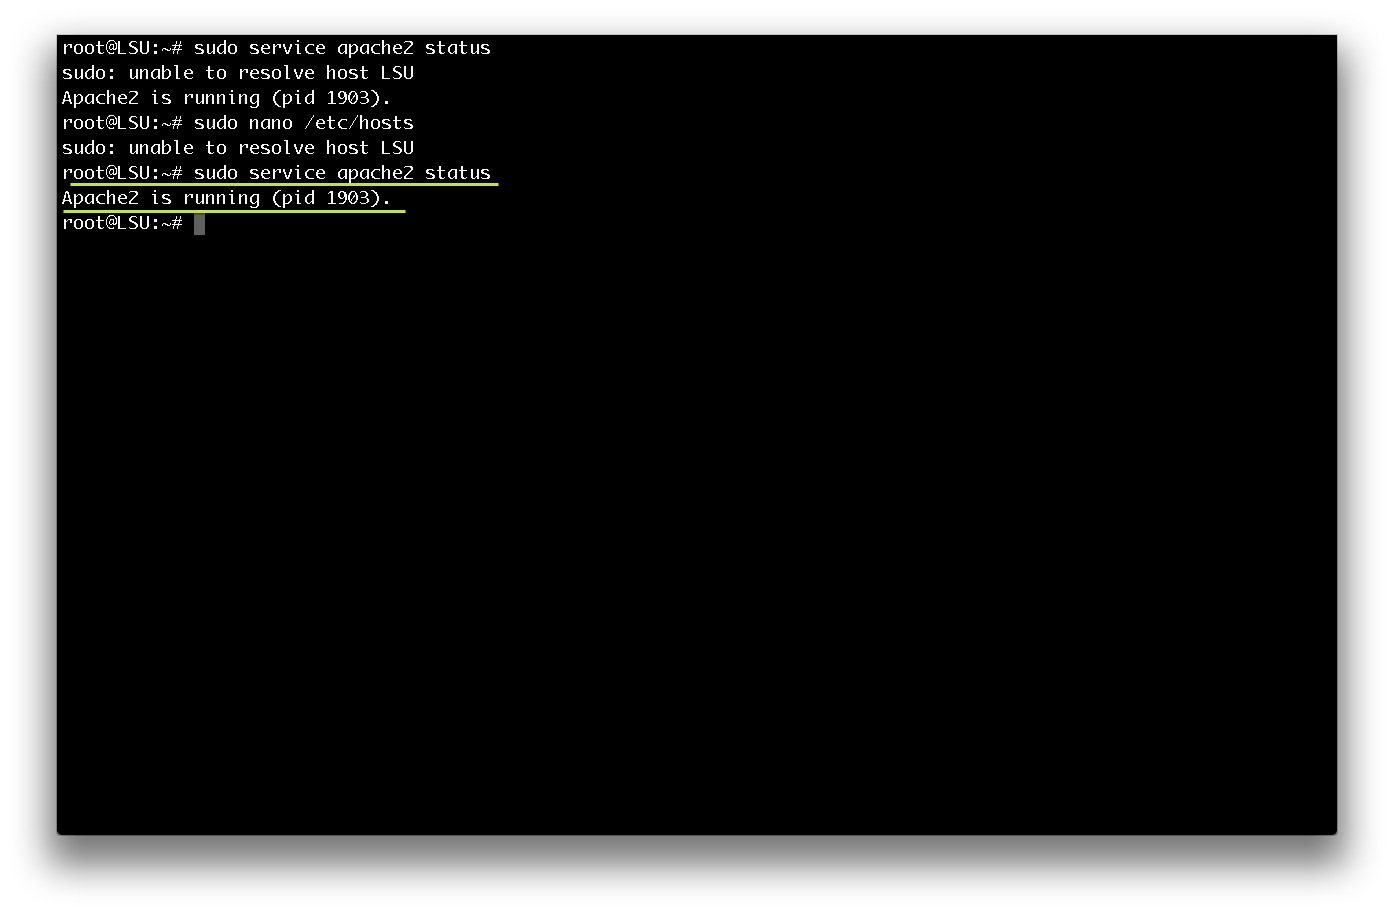
As you can seen when we type “sudo“ command RPi gives an warning “sudo: unable to resolve host LSU ” this warning gives because we changed our host name to “LSU” but did not insert the new host name into “hosts” file. Here’s how to solve this type,
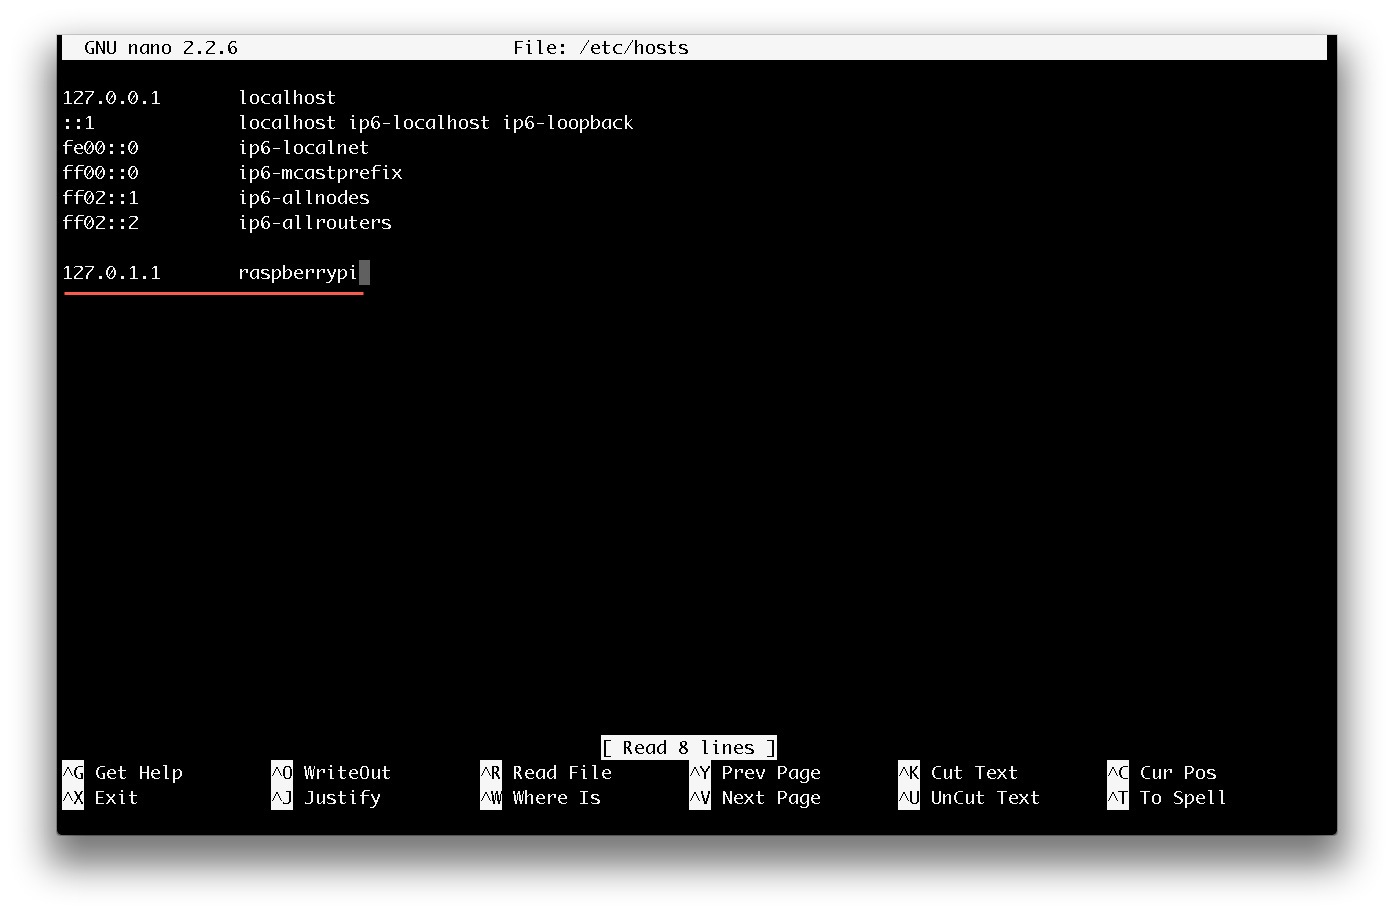
# sudo nano /etc/hosts
Then the hosts file will open in nano editor, now you will see theres a entry “127.0.1.1 raspberrypi ” this will cause the warning so now all we need to do is to change this into our host name which in this case “LSU”.
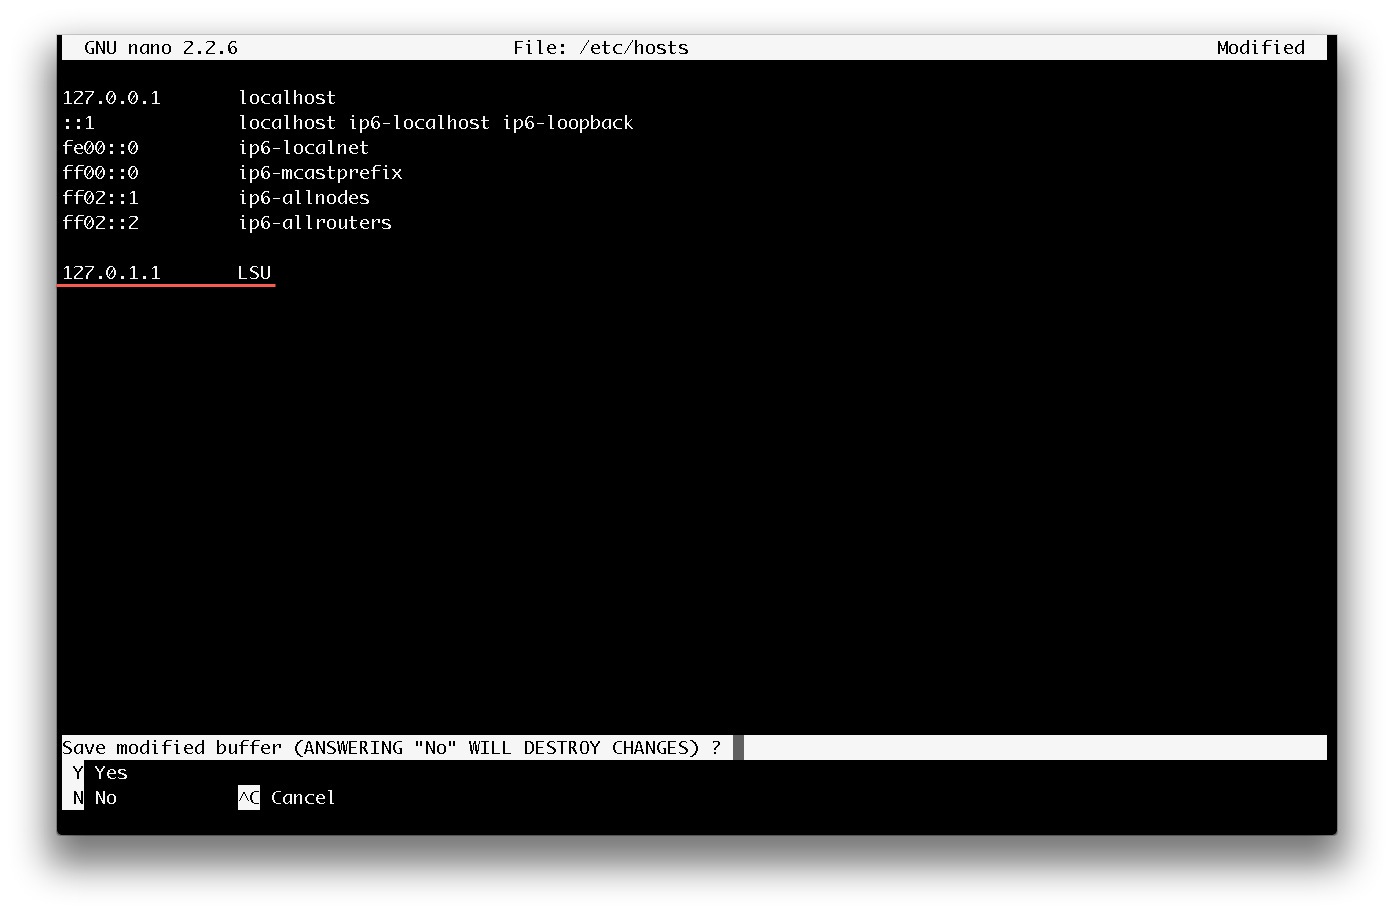
all done now run the previous command to verify this is correct. Now you will see there’s no warning like before.
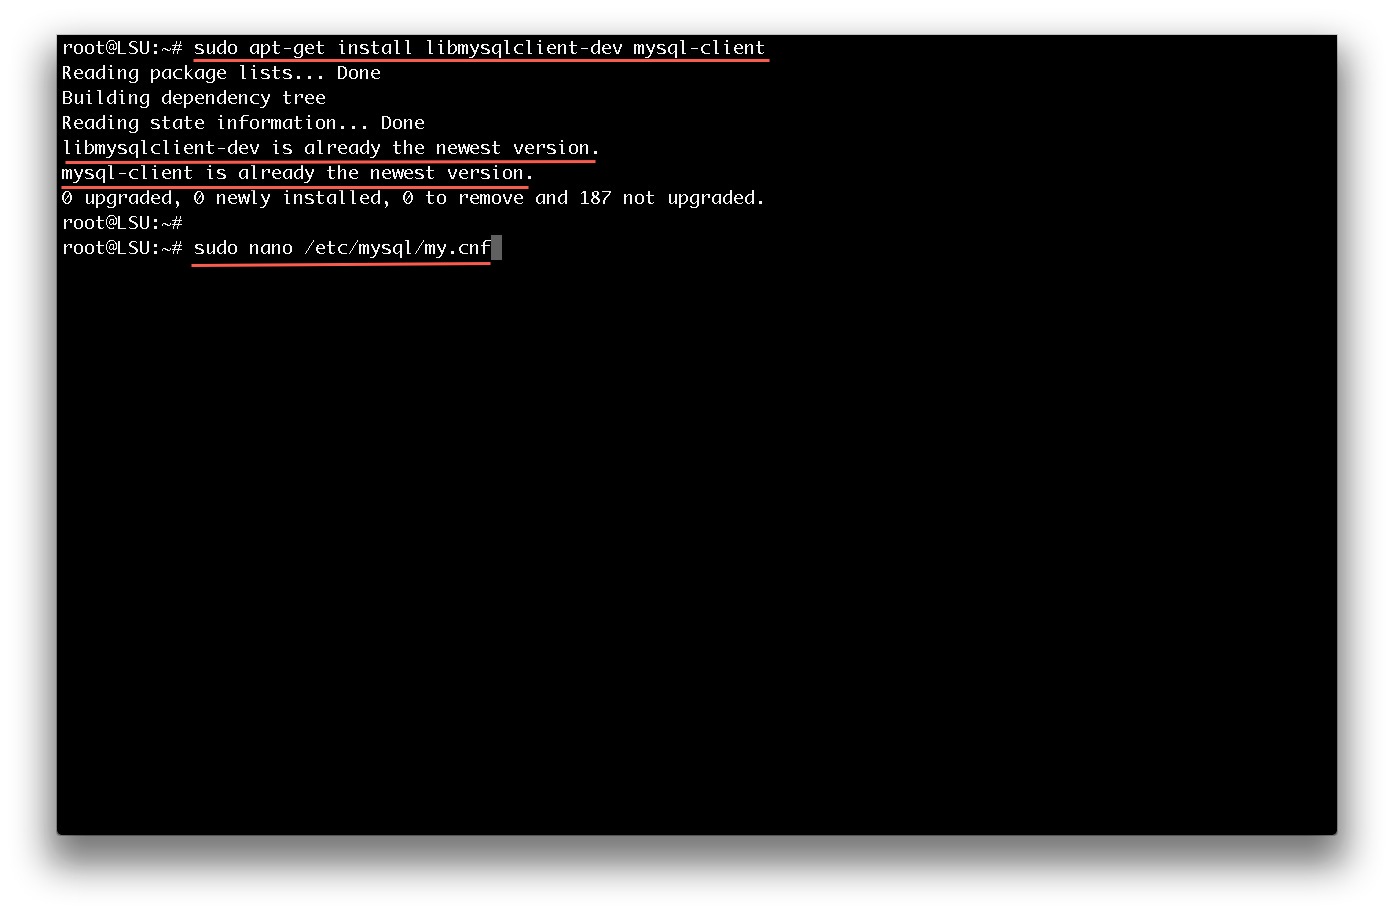
Now for work with database MySql data base must be installed (There are some alternatives also) there is a problem occurred when installing mysyl and it did not install properly and giving some errors like missing ‘my.cnf’ file. This will happen when you install “mysql-server and my-sql client first ” so don’t do it (if already done that purge mysql and reinstall using following steps), and also there are not enough buffer pool size. To install mysql database first need to find that ” my.cnf ” file to edit buffer pool size.
To install mysql properly first type,
# sudo apt-get install libmysqlclient-dev mysql-client
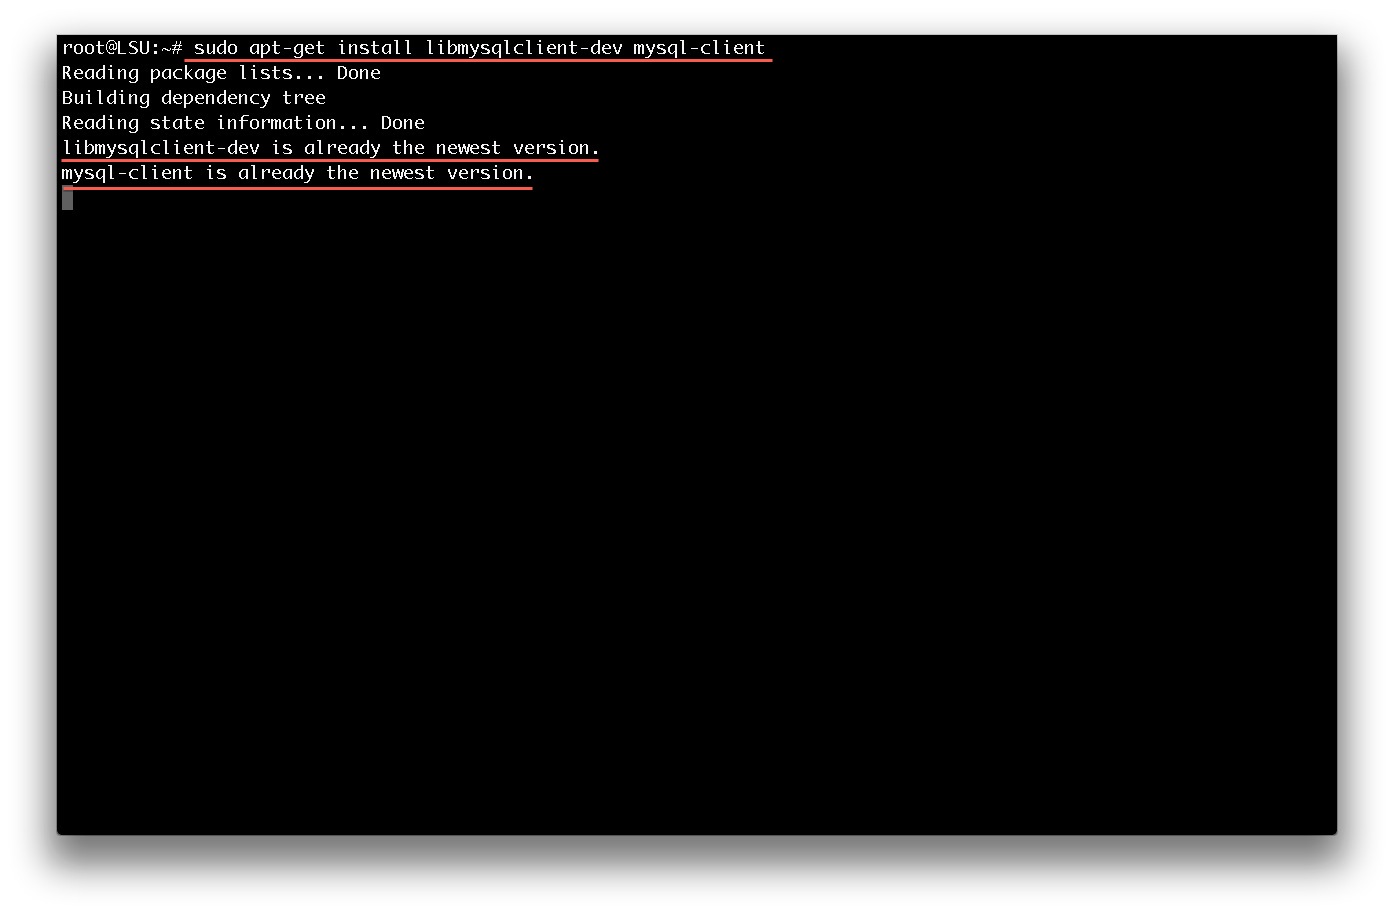
Note: i already installed the libmysqlclient-dev and mysql-client. This is my second attempt to show the installation steps correctly.
then browse for ‘my.cnf‘ file type,
# sudo nano /etc/mysql/my.cnf
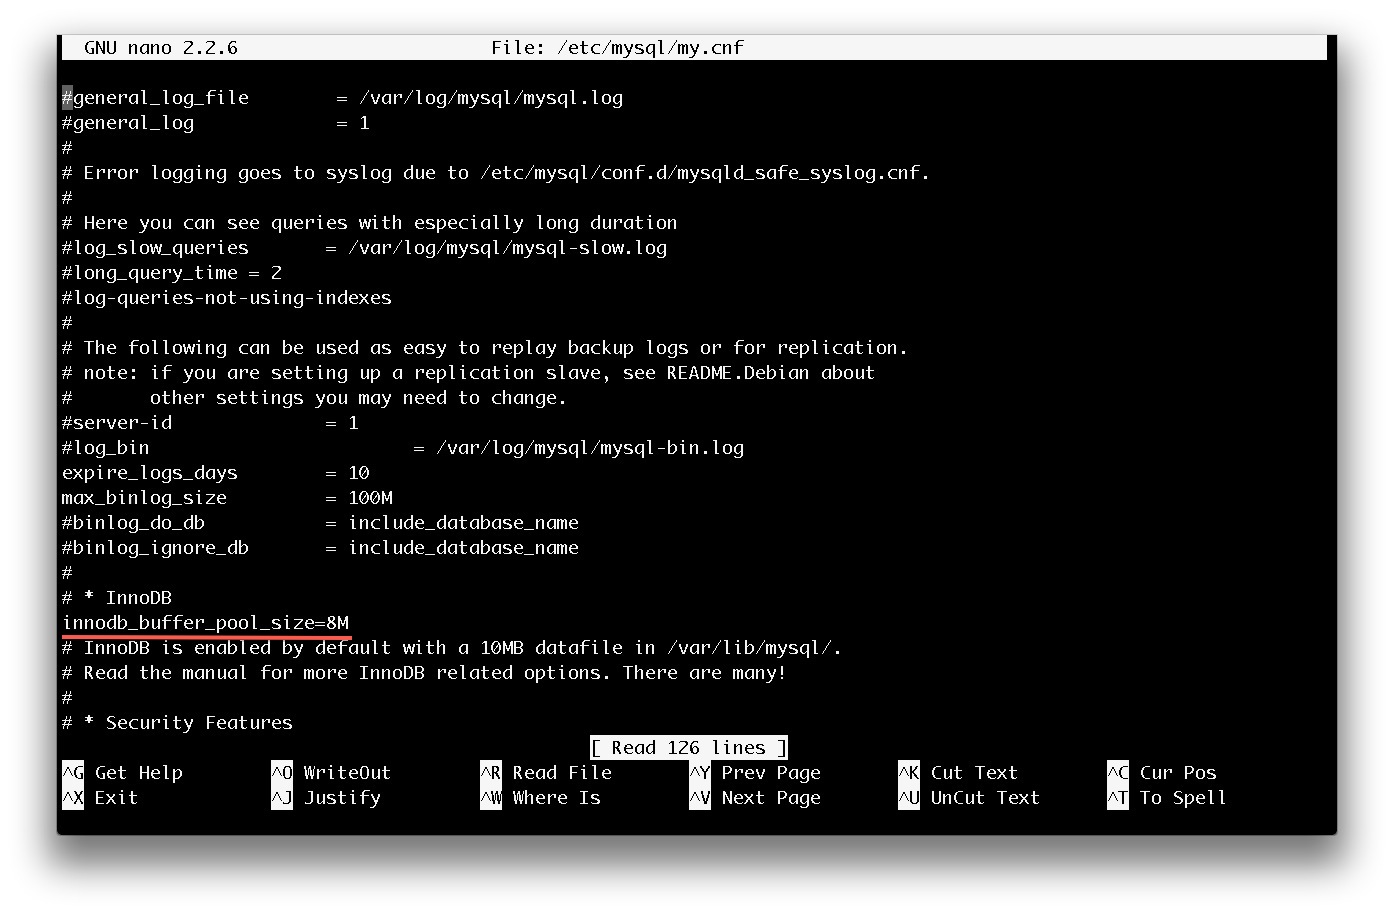
then find the ‘bind address‘ line and comment the line bind address (after commenting it must look like this ‘ #bind address ‘ )

then find the ‘innodb‘ line and add the following line after that
innodb_buffer_pool_size=8M
Now all the hard part is done, then install ‘mysql server’ and connect ‘ php5 with mysql database ‘ type,
# sudo apt-get install mysql-server php5-mysql
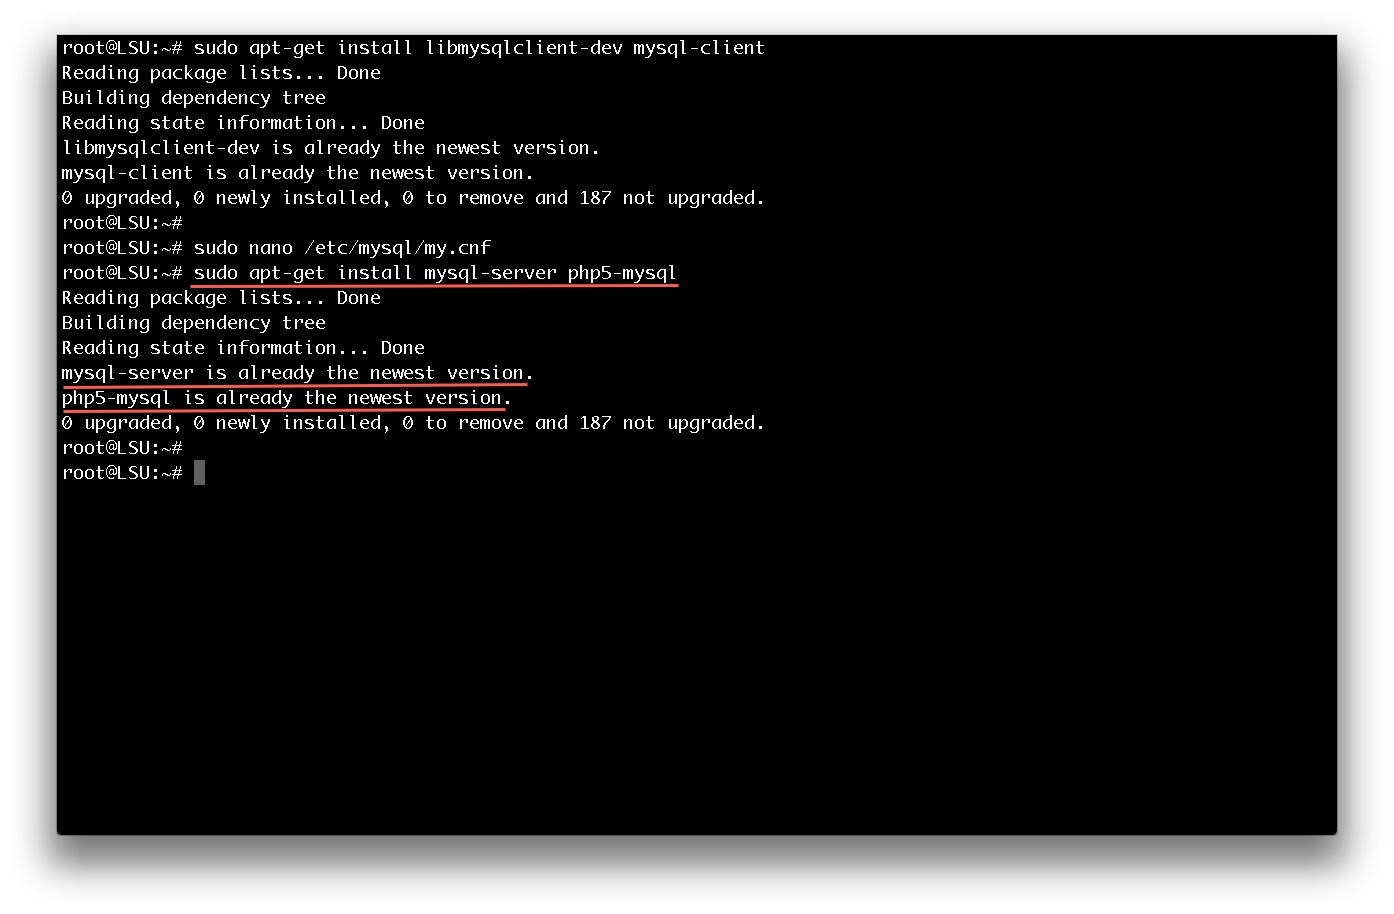
Note: i already installed the mysql server and php5. This is my second attempt to show the installation steps correctly.
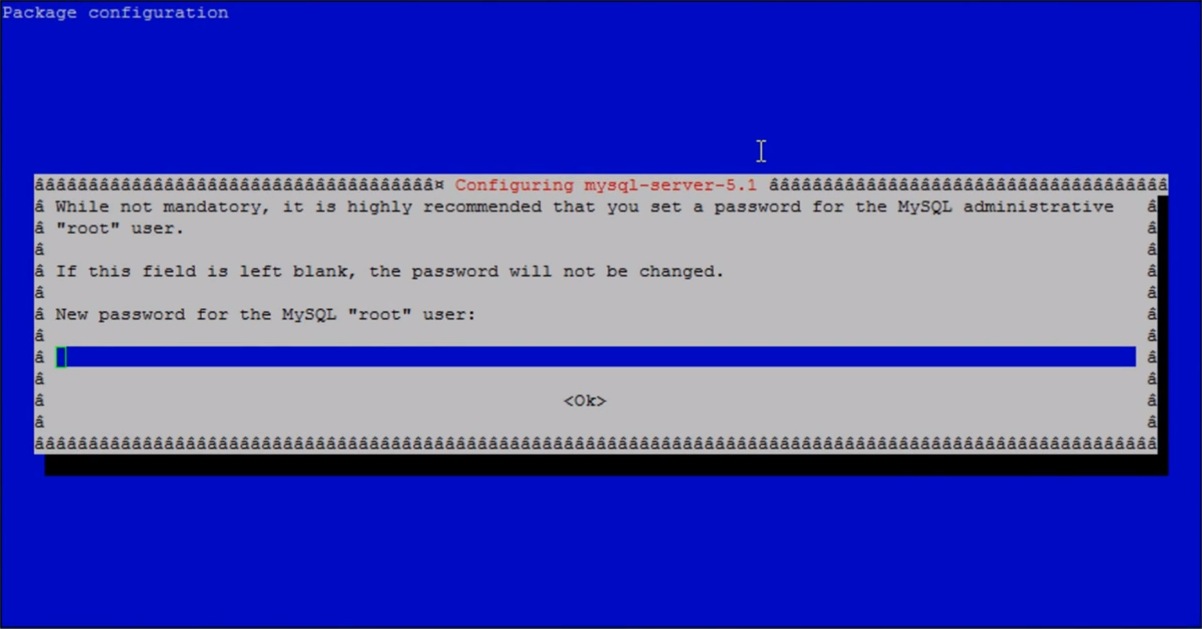
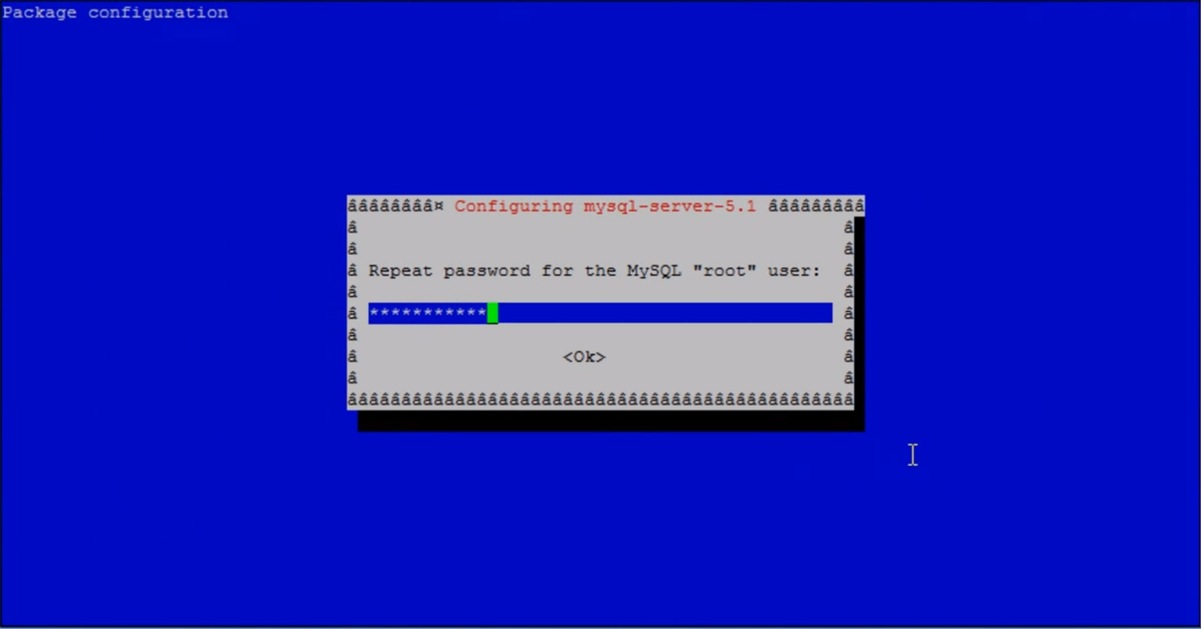
Then popup menu asks for a password when installation runs, and agin confirm your password this will be your mysql database password.
If you are using some sensor data need to ba save in mysql database you need to connect ‘python’ and ‘mysql’ to do that type,
# sudo apt-get install python-mysqldb
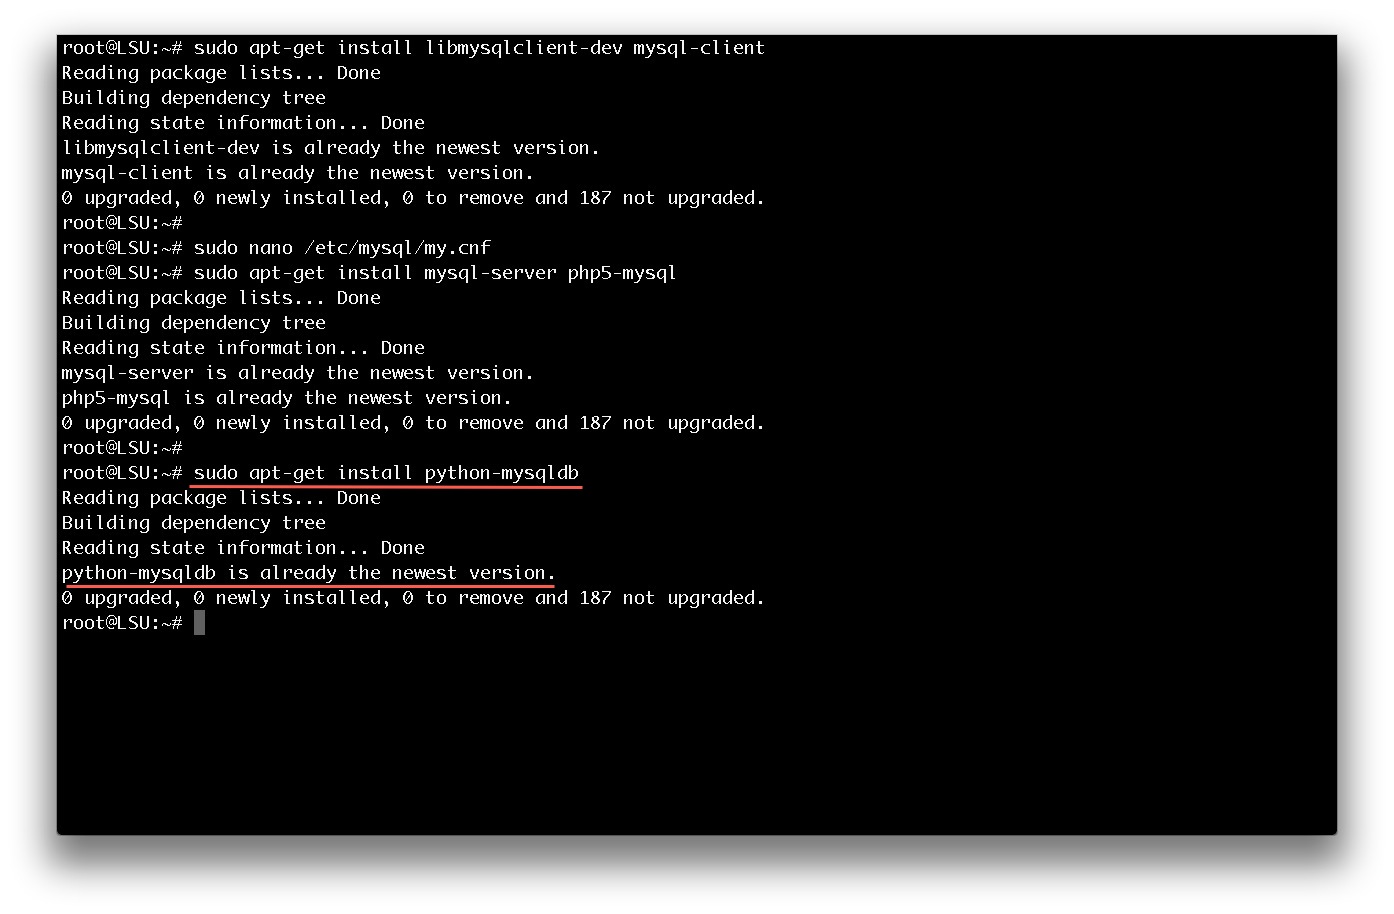
Note: i already installed the python. This is my second attempt to show the installation steps correctly.
if this gets an error try this type,
# sudo apt-get install libmysqlclient18
# sudo apt-get install python-mysqldb
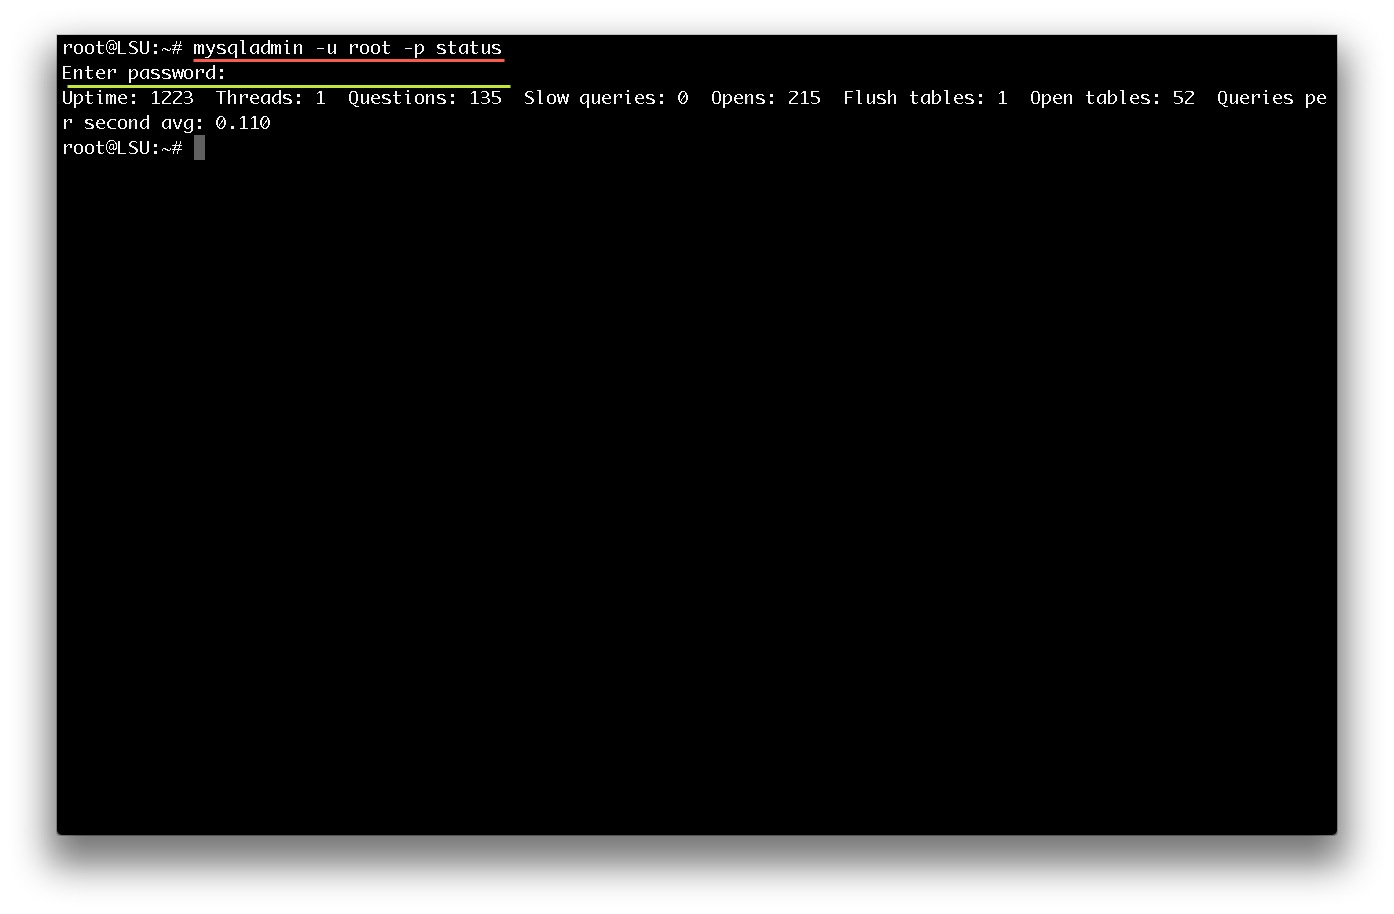
To verify mysql server installed correctly type,
#mysqladmin -u root -p status
then give the password that you insert, when installing mysql database.
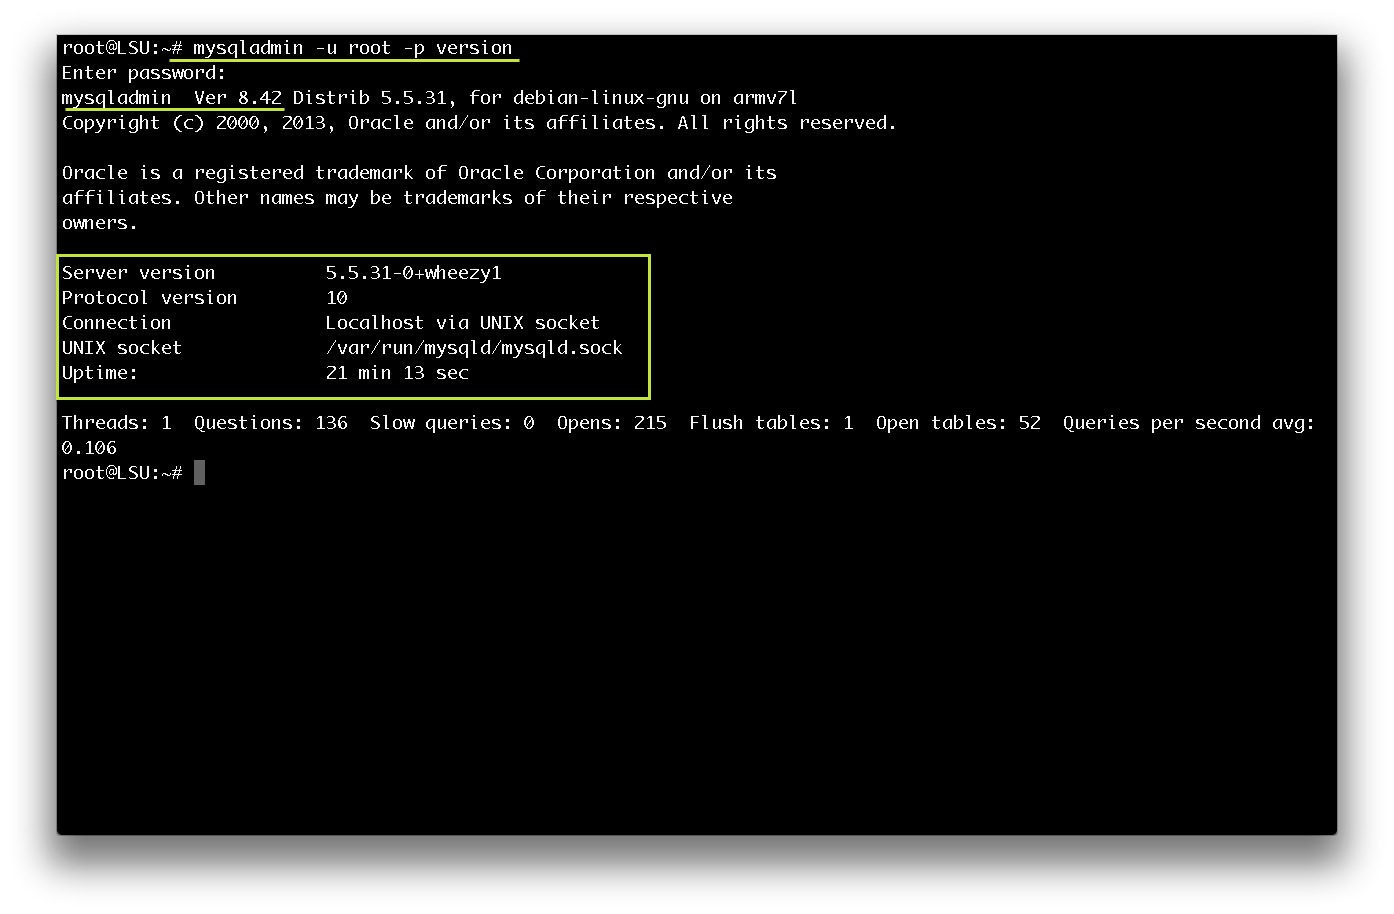
To check mysql version type,
#mysqladmin -u root -p version
Congratulation now you have working Raspberry Pi based WEB SERVER..! Enjoy 🙂
References
Raspberry Pi • View topic – USB-WiFi FTP Server for iPhone. 2013.Raspberry Pi • View topic – USB-WiFi FTP Server for iPhone. [ONLINE] Available at: http://www.raspberrypi.org/phpBB3/viewtopic.php?f=36&t=31543. [Accessed May 2013].
Getting started with Debian linux | Raspberry Pi. 2013. Getting started with Debian linux | Raspberry Pi. [ONLINE] Available at: http://www.raspberry-pi.co.uk/projects/getting-started-with-debian-linux/. [Accessed May 2013].
NetworkConfiguration – Debian Wiki. 2013. NetworkConfiguration – Debian Wiki. [ONLINE] Available at: http://wiki.debian.org/NetworkConfiguration. [Accessed May 2013].
NetworkManager – Debian Wiki. 2013. NetworkManager – Debian Wiki. [ONLINE] Available at: http://wiki.debian.org/NetworkManager. [Accessed May 2013].
linux – How is the loopback network interface implemented? – Unix & Linux Stack Exchange. 2013. linux – How is the loopback network interface implemented? – Unix & Linux Stack Exchange. [ONLINE] Available at:http://unix.stackexchange.com/questions/46443/how-is-the-loopback-network-interface-implemented. [Accessed May 2013].
/etc/resolve.conf or resolv.conf File Example | TheOS.in. 2013./etc/resolve.conf or resolv.conf File Example | TheOS.in. [ONLINE] Available at: http://theos.in/desktop-linux/resolve-conf-linux-example/. [Accessed May 2013].
Switching from a dynamic to a static IP address. 2013. Switching from a dynamic to a static IP address. [ONLINE] Available at:http://www.fileformat.info/tip/linux/dynamic2static.htm. [Accessed May 2013].
How To Use Proxy Server To Access Internet at Shell Prompt With http_proxy Variable. 2013. How To Use Proxy Server To Access Internet at Shell Prompt With http_proxy Variable. [ONLINE] Available at:http://www.cyberciti.biz/faq/linux-unix-set-proxy-environment-variable/. [Accessed May 2013].
Proxy settings – ArchWiki. 2013. Proxy settings – ArchWiki. [ONLINE] Available at: https://wiki.archlinux.org/index.php/Proxy_settings. [Accessed May 2013].
EnvironmentVariables – Community Ubuntu Documentation. 2013.EnvironmentVariables – Community Ubuntu Documentation. [ONLINE] Available at: https://help.ubuntu.com/community/EnvironmentVariables. [Accessed May 2013].
Web proxy client – Grid5000. 2013. Web proxy client – Grid5000. [ONLINE] Available at: https://www.grid5000.fr/mediawiki/index.php/Web_proxy_client. [Accessed May 2013].
xfce – How do I set systemwide proxy servers in Xubuntu, Lubuntu or Ubuntu Studio? – Ask Ubuntu. 2013. xfce – How do I set systemwide proxy servers in Xubuntu, Lubuntu or Ubuntu Studio? – Ask Ubuntu. [ONLINE] Available at:http://askubuntu.com/questions/150210/how-do-i-set-systemwide-proxy-servers-in-xubuntu-lubuntu-or-ubuntu-studio. [Accessed May 2013].
“Unable to connect” error with apt-get? – Ask Ubuntu. 2013. “Unable to connect” error with apt-get? – Ask Ubuntu. [ONLINE] Available at:http://askubuntu.com/questions/164169/unable-to-connect-error-with-apt-get. [Accessed May 2013].
Raspberry Pi How to: Learning Linux Commands – Raspberry Pi Blog . 2013.Raspberry Pi How to: Learning Linux Commands – Raspberry Pi Blog . [ONLINE] Available at: http://www.jeremymorgan.com/tutorials/raspberry-pi/how-to-linux/. [Accessed May 2013].
Raspberry Pi • View topic – PHP and MYSQL. 2013. Raspberry Pi • View topic – PHP and MYSQL. [ONLINE] Available at:http://www.raspberrypi.org/phpBB3/viewtopic.php?f=34&t=30424. [Accessed 07 June 2013].
12 Ways to Make a Raspberry Pi Web Server – wikiHow. 2013. 12 Ways to Make a Raspberry Pi Web Server – wikiHow. [ONLINE] Available at:http://www.wikihow.com/Make-a-Raspberry-Pi-Web-Server. [Accessed 07 June 2013].
Raspberry Pi C# Mono MySql Connector Installation | Raspberry Pi | 512MB of Awesome. 2013. Raspberry Pi C# Mono MySql Connector Installation | Raspberry Pi | 512MB of Awesome. [ONLINE] Available at: http://c-mobberley.com/wordpress/index.php/2013/04/24/raspberry-pi-c-mono-mysql-connector-installation/. [Accessed 07 June 2013].
Ten pi-fect projects for your new Raspberry Pi • The Register. 2013. Ten pi-fect projects for your new Raspberry Pi • The Register. [ONLINE] Available at:http://www.theregister.co.uk/2013/03/14/feature_ten_raspberry_pi_projects/. [Accessed 07 June 2013].
Python mysql with variables – Stack Overflow. 2013. Python mysql with variables – Stack Overflow. [ONLINE] Available at:http://stackoverflow.com/questions/775296/python-mysql-with-variables. [Accessed 07 June 2013].
get value from MySQL database with PHP – Stack Overflow. 2013. get value from MySQL database with PHP – Stack Overflow. [ONLINE] Available at: http://stackoverflow.com/questions/3047506/get-value-from-mysql-database-with-php. [Accessed 07 June 2013].
Getting Data from MySQL Database using PHP. 2013. Getting Data from MySQL Database using PHP. [ONLINE] Available at:http://www.tutorialspoint.com/php/mysql_select_php.htm. [Accessed 07 June 2013].
Python and MySQL on Debian | SEBBY3000. 2013. Python and MySQL on Debian | SEBBY3000. [ONLINE] Available at: http://www.sebby3000.com/?p=58. [Accessed 07 June 2013].